> ## Documentation Index
> Fetch the complete documentation index at: https://docs.openmic.ai/llms.txt
> Use this file to discover all available pages before exploring further.
# Transfer Call
> Learn how to configure call transfer settings for both simple agents and workflow agents, with options for warm transfers, cold transfers, and webhook-based dynamic routing.
export const ArcadeEmbed = ({url, title}) => {
return
;
};
**Seamless Handoffs**: The Transfer Call function enables your AI agents to intelligently route calls to human agents or other AI agents, with options for warm transfers (with context), cold transfers (immediate), and dynamic webhook-based routing.
## Interactive Demo
See how to set up the Transfer Call function for both simple agents and workflow agents:
***
## Overview
The Transfer Call function allows your AI agents to seamlessly route calls to human agents or other AI agents during conversations. OpenMic provides flexible transfer options to match your business needs.
**Key Benefits:**
* Route calls to the right person or department automatically
* Provide context to receiving agents with warm transfers
* Integrate with external systems for dynamic routing
* Improve customer satisfaction with intelligent handoffs
**Transfer Modes:**
* **Static Mode**: Configure transfers directly in the dashboard with warm/cold transfer options, human detection, agent confirmation, and custom handoff messages
* **Webhook Mode**: Dynamically route calls using your own backend logic for real-time destination determination with fallback support
***
## Add Transfer Call to Simple Agents
Follow these steps to add the Transfer Call function to your AI voice agent:
### Step 1: Navigate to Simple Agents
From your dashboard sidebar, click on **Simple Agents**.
***
### Step 2: Select Your Agent
Click on the agent you want to configure from the list.
***
### Step 3: Open Custom Functions Tab
Click on the **Custom Functions** tab in the agent configuration.
***
### Step 4: Add New Function
Click the **Add Function** button to open the function selection menu.
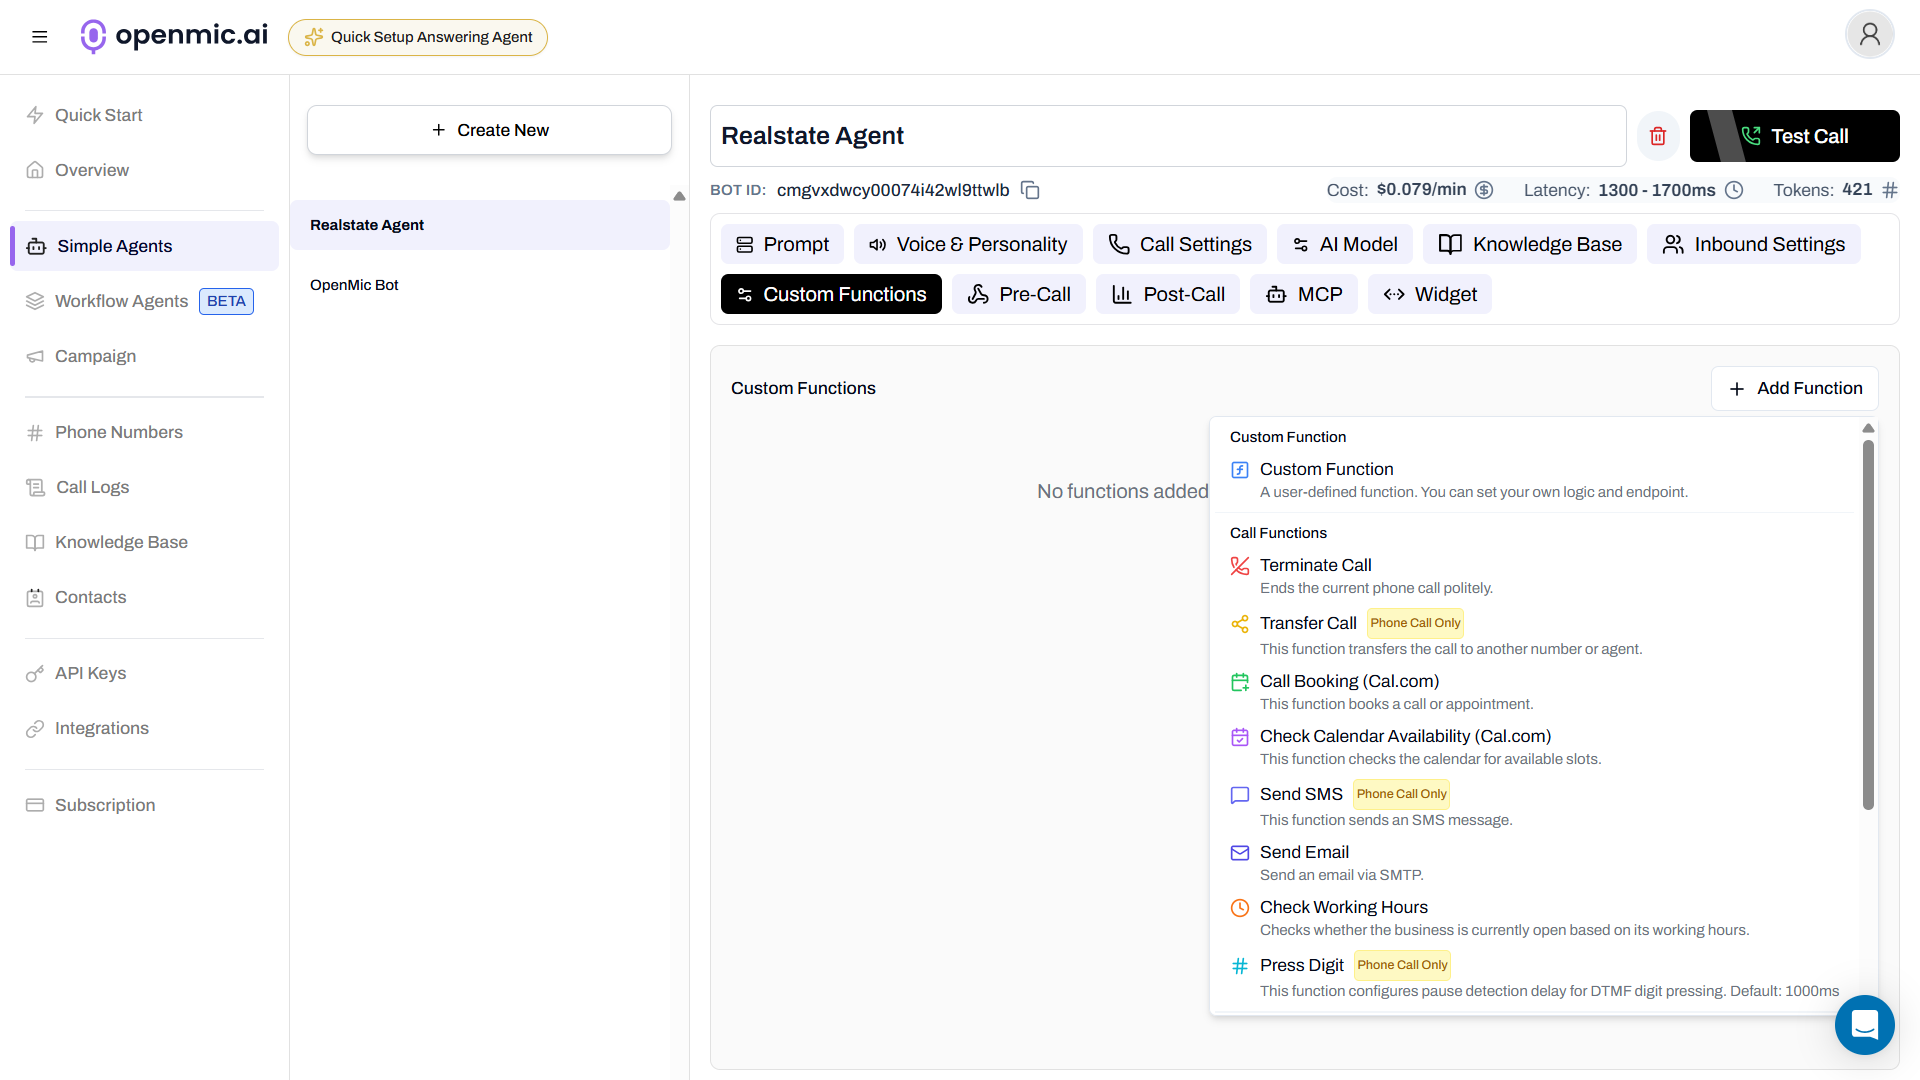 ***
### Step 5: Select Transfer Call
Click on **Transfer Call** from the available functions. A configuration popup will appear.
***
### Step 6: Configure Basic Settings
***
### Step 5: Select Transfer Call
Click on **Transfer Call** from the available functions. A configuration popup will appear.
***
### Step 6: Configure Basic Settings
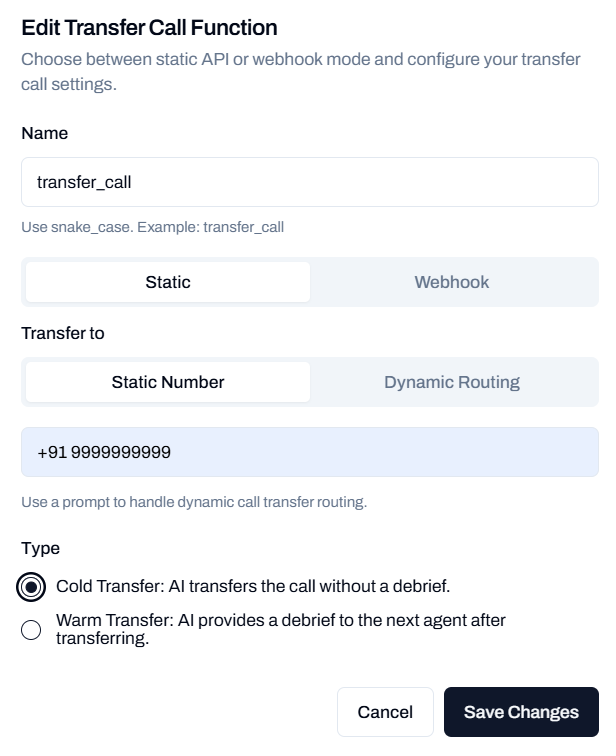 Fill in the required fields:
#### Function Name
Define the function name using snake\_case (e.g., `transfer_call`). This name will be used by the AI to trigger the transfer.
#### Mode
Choose between two modes:
* **Static**: Configure transfer settings directly in the dashboard
* **Webhook**: Use dynamic routing via webhook to determine transfer destination at runtime
#### Transfer To
When using **Static mode**, select your transfer destination type:
**Static Number**: Specify a fixed phone number to transfer calls to.
Enter a phone number in E.164 format (e.g., +1234567890). All transfers will go to this number.
**Dynamic Routing**: Use a prompt with logic to route calls to different numbers based on context.
**How it works:**
* Define routing logic in the prompt field
* Include multiple phone numbers with conditions
* AI will determine the correct destination based on the conversation
**Example:**
```
If the user wants support, transfer to +1234567890
If the user wants sales, transfer to +1234567891
Otherwise, transfer to +1234567892
```
#### Webhook Mode Configuration
When using **Webhook mode**, you can dynamically determine the transfer destination at runtime using your webhook endpoint.
**Transfer Number**
* Enter a phone number in E.164 format (e.g., +1234567890)
* This number can be used as a fallback or default destination
**Call a webhook before running this tool**
Use this to validate or enrich data before the transfer happens.
Toggle this option to call a webhook before executing the transfer. This allows you to:
* Dynamically determine the transfer destination based on real-time data
* Validate the transfer conditions
* Enrich the call data with additional context from external systems (CRM, availability APIs, etc.)
**Webhook URL Options**
You can choose between two webhook URL sources:
1. **Use the pre-call webhook URL**: Reuse the webhook URL configured in your agent settings
If no pre-call webhook URL is configured in agent settings, this option cannot be used. Configure it first in your bot's main settings.
2. **Custom webhook URL**: Provide a specific webhook URL for this transfer function
* Example: `https://your-domain.com/webhook/pre-tool`
* This URL will receive the transfer request data and can return dynamic variables including the transfer destination
**How Webhook Mode Works:**
When the transfer\_call tool is triggered:
1. OpenMic sends a POST request to your webhook with call details
2. Your webhook returns dynamic variables, including the `transfer_number`
3. The call is transferred to the number specified in your webhook response
For detailed webhook specifications, see the [Pre-Tool Webhook documentation](/pre-tool-webhook).
**Graceful Degradation**: If your webhook fails or times out (3 seconds), the fallback transfer number you configured will be used.
***
### Step 7: Save the Function
Click **Save** to add the Transfer Call function to your agent.
Once saved, your AI agent will be able to use this function during conversations when the conditions you described are met.
***
## Add Transfer Call to Workflow Agents
Follow these steps to add the Transfer Call function to your workflow agent:
### Step 1: Navigate to Workflow Agents
From your dashboard sidebar, click on **Workflow Agents**.
***
### Step 2: Select Your Workflow
Click on the workflow you want to configure from the list.
***
### Step 3: Add Transfer Node
In the workflow editor, click the **Add Node** button (usually a "+" icon) where you want to add the transfer step.
Fill in the required fields:
#### Function Name
Define the function name using snake\_case (e.g., `transfer_call`). This name will be used by the AI to trigger the transfer.
#### Mode
Choose between two modes:
* **Static**: Configure transfer settings directly in the dashboard
* **Webhook**: Use dynamic routing via webhook to determine transfer destination at runtime
#### Transfer To
When using **Static mode**, select your transfer destination type:
**Static Number**: Specify a fixed phone number to transfer calls to.
Enter a phone number in E.164 format (e.g., +1234567890). All transfers will go to this number.
**Dynamic Routing**: Use a prompt with logic to route calls to different numbers based on context.
**How it works:**
* Define routing logic in the prompt field
* Include multiple phone numbers with conditions
* AI will determine the correct destination based on the conversation
**Example:**
```
If the user wants support, transfer to +1234567890
If the user wants sales, transfer to +1234567891
Otherwise, transfer to +1234567892
```
#### Webhook Mode Configuration
When using **Webhook mode**, you can dynamically determine the transfer destination at runtime using your webhook endpoint.
**Transfer Number**
* Enter a phone number in E.164 format (e.g., +1234567890)
* This number can be used as a fallback or default destination
**Call a webhook before running this tool**
Use this to validate or enrich data before the transfer happens.
Toggle this option to call a webhook before executing the transfer. This allows you to:
* Dynamically determine the transfer destination based on real-time data
* Validate the transfer conditions
* Enrich the call data with additional context from external systems (CRM, availability APIs, etc.)
**Webhook URL Options**
You can choose between two webhook URL sources:
1. **Use the pre-call webhook URL**: Reuse the webhook URL configured in your agent settings
If no pre-call webhook URL is configured in agent settings, this option cannot be used. Configure it first in your bot's main settings.
2. **Custom webhook URL**: Provide a specific webhook URL for this transfer function
* Example: `https://your-domain.com/webhook/pre-tool`
* This URL will receive the transfer request data and can return dynamic variables including the transfer destination
**How Webhook Mode Works:**
When the transfer\_call tool is triggered:
1. OpenMic sends a POST request to your webhook with call details
2. Your webhook returns dynamic variables, including the `transfer_number`
3. The call is transferred to the number specified in your webhook response
For detailed webhook specifications, see the [Pre-Tool Webhook documentation](/pre-tool-webhook).
**Graceful Degradation**: If your webhook fails or times out (3 seconds), the fallback transfer number you configured will be used.
***
### Step 7: Save the Function
Click **Save** to add the Transfer Call function to your agent.
Once saved, your AI agent will be able to use this function during conversations when the conditions you described are met.
***
## Add Transfer Call to Workflow Agents
Follow these steps to add the Transfer Call function to your workflow agent:
### Step 1: Navigate to Workflow Agents
From your dashboard sidebar, click on **Workflow Agents**.
***
### Step 2: Select Your Workflow
Click on the workflow you want to configure from the list.
***
### Step 3: Add Transfer Node
In the workflow editor, click the **Add Node** button (usually a "+" icon) where you want to add the transfer step.
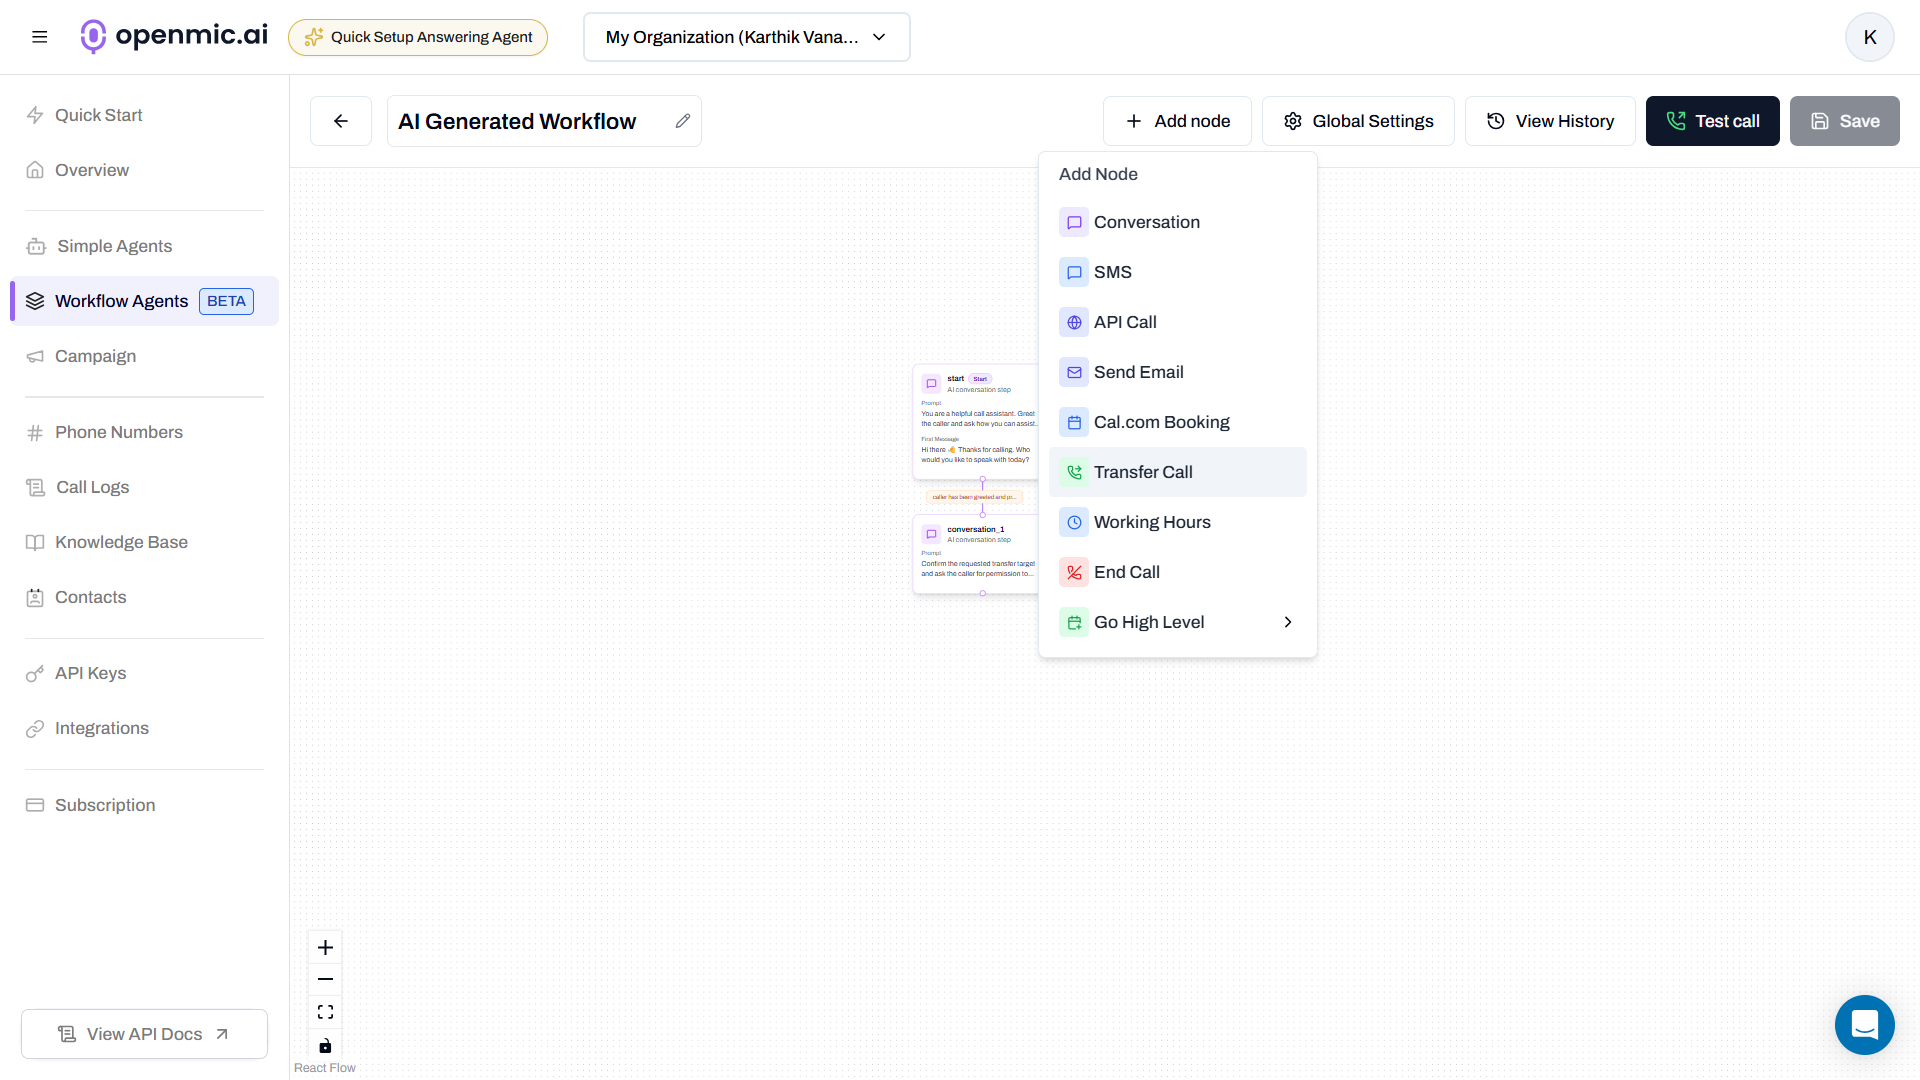 ***
### Step 4: Select Transfer Node
From the node types, click on **Transfer** to add a transfer node to your workflow.
***
### Step 5: Configure the Transfer Node
Click on the newly added transfer node to open its configuration panel.
***
### Step 4: Select Transfer Node
From the node types, click on **Transfer** to add a transfer node to your workflow.
***
### Step 5: Configure the Transfer Node
Click on the newly added transfer node to open its configuration panel.
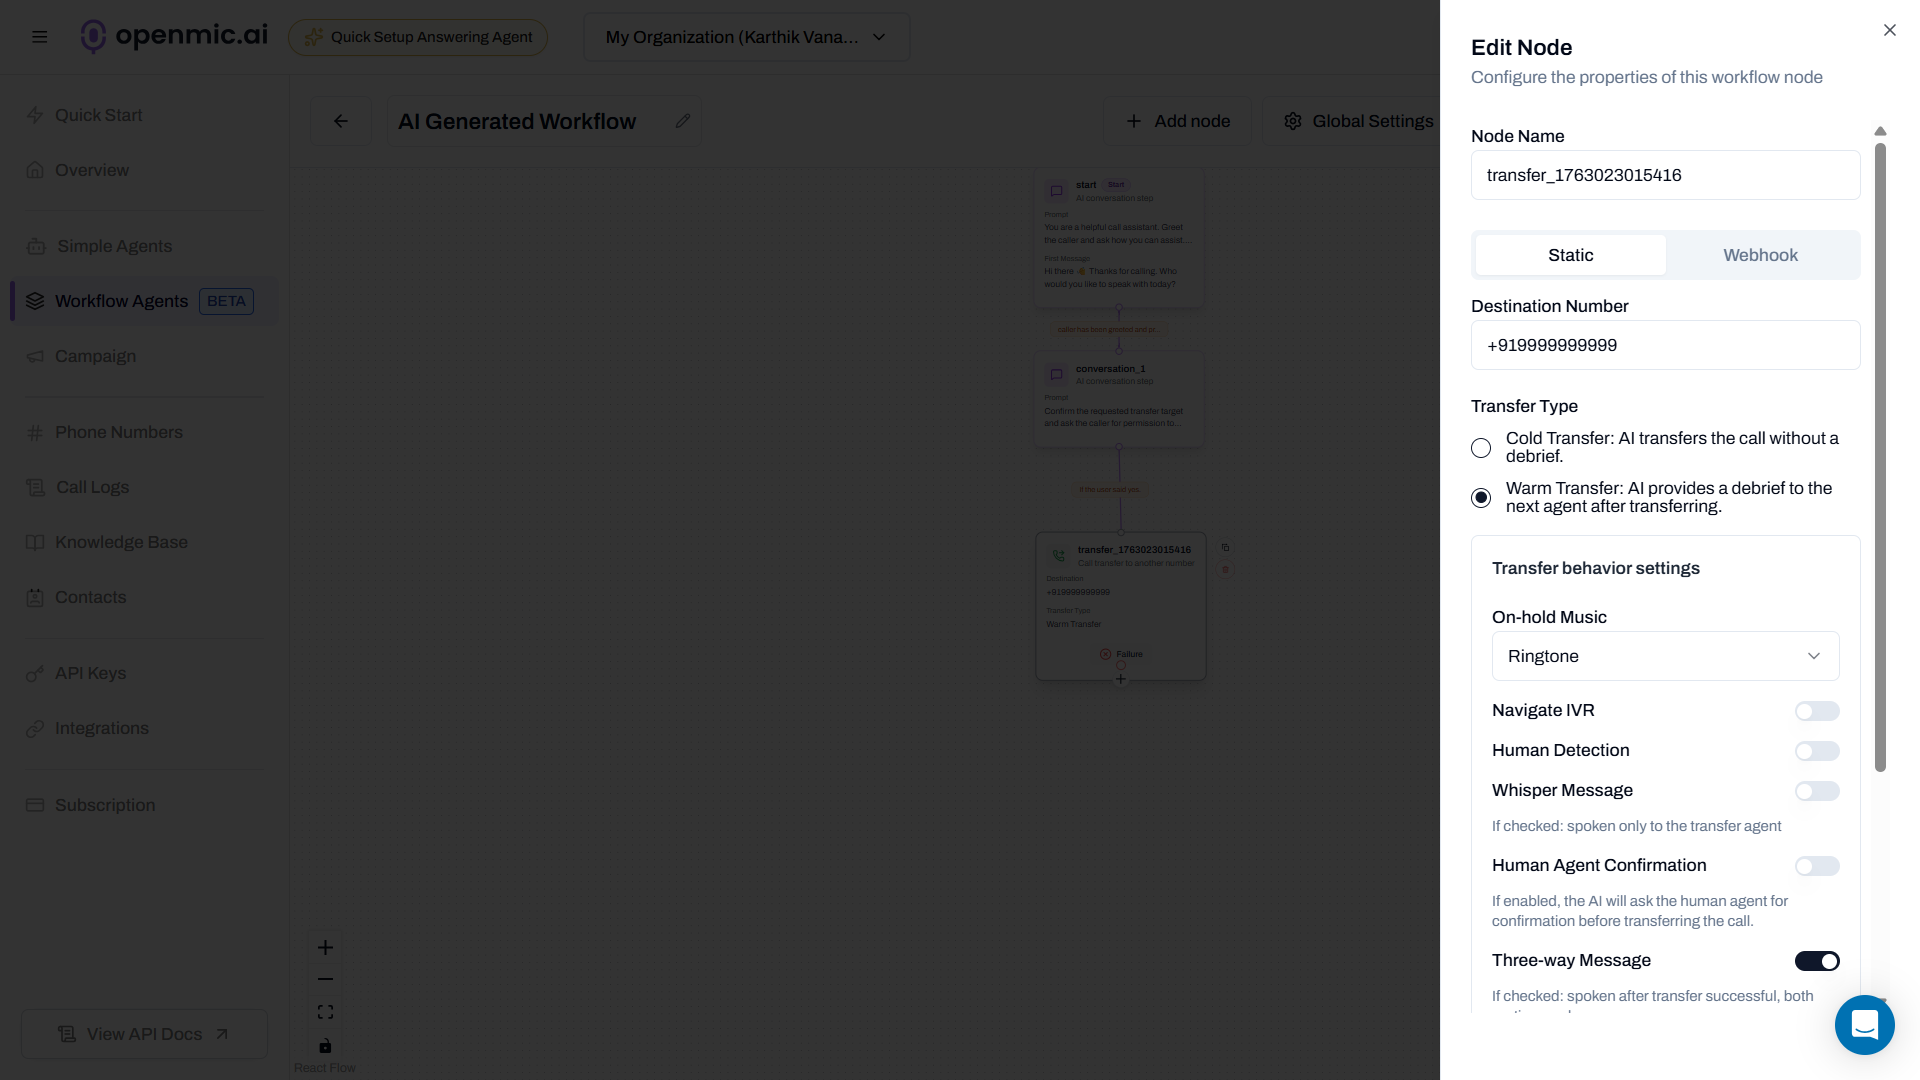 Fill in the required fields:
#### Function Name
Give your transfer step a descriptive name (e.g., "Transfer to Sales", "Route to Support", "Escalate to Manager").
#### Mode
Choose between two modes:
* **Static**: Configure transfer settings directly in the workflow
* **Webhook**: Use dynamic routing via webhook to determine transfer destination at runtime
#### Destination Number
When using **Static mode**, enter the phone number to transfer calls to:
* Enter a phone number in E.164 format (e.g., +1234567890)
* All transfers from this workflow node will go to this number
#### Webhook Mode Configuration
When using **Webhook mode**, you can dynamically determine the transfer destination at runtime using your webhook endpoint.
**Transfer Number**
* Enter a phone number in E.164 format (e.g., +1234567890)
* This number can be used as a fallback or default destination
**Call a webhook before running this tool**
Use this to validate or enrich data before the transfer happens.
Toggle this option to call a webhook before executing the transfer. This allows you to:
* Dynamically determine the transfer destination based on real-time data
* Validate the transfer conditions
* Enrich the call data with additional context from external systems (CRM, availability APIs, etc.)
**Webhook URL Options**
You can choose between two webhook URL sources:
1. **Use the pre-call webhook URL**: Reuse the webhook URL configured in your agent settings
If no pre-call webhook URL is configured in agent settings, this option cannot be used. Configure it first in your bot's main settings.
2. **Custom webhook URL**: Provide a specific webhook URL for this transfer function
* Example: `https://your-domain.com/webhook/pre-tool`
* This URL will receive the transfer request data and can return dynamic variables including the transfer destination
**How Webhook Mode Works:**
When the transfer node is executed:
1. OpenMic sends a POST request to your webhook with call details
2. Your webhook returns dynamic variables, including the `transfer_number`
3. The call is transferred to the number specified in your webhook response
For detailed webhook specifications, see the [Pre-Tool Webhook documentation](/pre-tool-webhook).
**Graceful Degradation**: If your webhook fails or times out (3 seconds), the fallback transfer number you configured will be used.
***
### Step 6: Save the Workflow
Click the **Save** button in the top right corner of the workflow editor to apply your changes.
The transfer will be executed when the workflow execution reaches this node during the call or process flow.
***
## Configure Transfer Type and Behavior
The following transfer configuration options apply to both Simple Agents and Workflow Agents:
### Transfer Type
Warm and Cold transfer types are only available for **Static mode** as of now. Webhook mode support for these transfer type configurations will be available soon.
Choose between two transfer types:
**Cold Transfer**: AI transfers the call without a debrief.
The call is immediately transferred to the destination number. The AI agent disconnects after completing the transfer.
**Warm Transfer**: AI provides a debrief to the next agent after transferring.
After the call is transferred, the AI agent:
1. Detects if the other side is a human (optional)
2. Speaks a private whisper message to the transfer target (optional)
3. Connects all parties and speaks a three-way message (optional)
***
### Transfer Behavior Settings
These settings are only available when using **Static mode** with warm transfer enabled.
Fill in the required fields:
#### Function Name
Give your transfer step a descriptive name (e.g., "Transfer to Sales", "Route to Support", "Escalate to Manager").
#### Mode
Choose between two modes:
* **Static**: Configure transfer settings directly in the workflow
* **Webhook**: Use dynamic routing via webhook to determine transfer destination at runtime
#### Destination Number
When using **Static mode**, enter the phone number to transfer calls to:
* Enter a phone number in E.164 format (e.g., +1234567890)
* All transfers from this workflow node will go to this number
#### Webhook Mode Configuration
When using **Webhook mode**, you can dynamically determine the transfer destination at runtime using your webhook endpoint.
**Transfer Number**
* Enter a phone number in E.164 format (e.g., +1234567890)
* This number can be used as a fallback or default destination
**Call a webhook before running this tool**
Use this to validate or enrich data before the transfer happens.
Toggle this option to call a webhook before executing the transfer. This allows you to:
* Dynamically determine the transfer destination based on real-time data
* Validate the transfer conditions
* Enrich the call data with additional context from external systems (CRM, availability APIs, etc.)
**Webhook URL Options**
You can choose between two webhook URL sources:
1. **Use the pre-call webhook URL**: Reuse the webhook URL configured in your agent settings
If no pre-call webhook URL is configured in agent settings, this option cannot be used. Configure it first in your bot's main settings.
2. **Custom webhook URL**: Provide a specific webhook URL for this transfer function
* Example: `https://your-domain.com/webhook/pre-tool`
* This URL will receive the transfer request data and can return dynamic variables including the transfer destination
**How Webhook Mode Works:**
When the transfer node is executed:
1. OpenMic sends a POST request to your webhook with call details
2. Your webhook returns dynamic variables, including the `transfer_number`
3. The call is transferred to the number specified in your webhook response
For detailed webhook specifications, see the [Pre-Tool Webhook documentation](/pre-tool-webhook).
**Graceful Degradation**: If your webhook fails or times out (3 seconds), the fallback transfer number you configured will be used.
***
### Step 6: Save the Workflow
Click the **Save** button in the top right corner of the workflow editor to apply your changes.
The transfer will be executed when the workflow execution reaches this node during the call or process flow.
***
## Configure Transfer Type and Behavior
The following transfer configuration options apply to both Simple Agents and Workflow Agents:
### Transfer Type
Warm and Cold transfer types are only available for **Static mode** as of now. Webhook mode support for these transfer type configurations will be available soon.
Choose between two transfer types:
**Cold Transfer**: AI transfers the call without a debrief.
The call is immediately transferred to the destination number. The AI agent disconnects after completing the transfer.
**Warm Transfer**: AI provides a debrief to the next agent after transferring.
After the call is transferred, the AI agent:
1. Detects if the other side is a human (optional)
2. Speaks a private whisper message to the transfer target (optional)
3. Connects all parties and speaks a three-way message (optional)
***
### Transfer Behavior Settings
These settings are only available when using **Static mode** with warm transfer enabled.
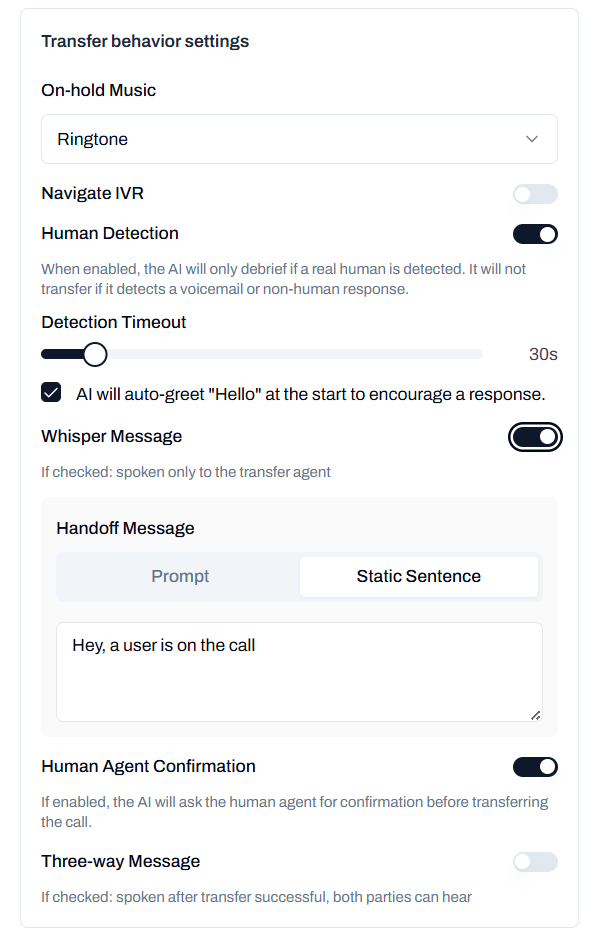 For warm transfers in static mode, you can configure advanced settings:
#### On-hold Music
Select the audio played to the caller while they are on hold during the transfer process. The default is a standard ringtone.
#### Navigate IVR
Toggle this setting if the transfer destination is an IVR system
Enable this to help the AI navigate automated phone systems when the transfer target has an IVR menu.
#### Human Detection
When enabled, the AI will only debrief if a real human is detected. It will not transfer if it detects a voicemail or non-human response.
**Detection Timeout**: Set the maximum time (default: 30s) the AI will wait to determine if the transfer target is a human.
**Auto-greet**: When checked, the AI will automatically say "Hello" at the start to encourage a response from the transfer target.
#### Whisper Message
If checked: spoken only to the transfer agent
Configure a private message that only the transfer target hears before connecting to the original caller. This can be:
* **Prompt**: Dynamic message generated by AI based on call context
* **Static Sentence**: Fixed message you define
Example: "Hey, a user is on the call"
#### Human Agent Confirmation
When enabled, the AI will ask the human agent for confirmation before transferring the call. This ensures the agent is ready and available to take the call.
If the agent declines or is unavailable, the transfer will be cancelled and the original caller will remain connected to the AI agent.
#### Three-way Message
If checked: spoken after transfer successful, both parties can hear
Configure a message spoken to both the transfer target and the original caller once the connection is established.
Choose between:
* **Prompt**: Dynamic message based on call context
* **Static Sentence**: Fixed message
Example: "Say both are connected"
***
## Configuration Best Practices
For Simple Agents, enhance the agent's understanding by incorporating transfer conditions into your bot's main prompt:
```
If the user is angry, frustrated, or requests to speak with a human,
use the transfer_call tool to transfer the conversation to a human agent.
```
This helps the AI understand when to automatically trigger the transfer function based on conversation context.
**When to Use Static Mode vs Webhook Mode:**
**Static Mode is best for:**
* Fixed transfer destinations that don't change
* Simple routing rules you can configure in the dashboard
* Quick setup without backend development
* Using built-in warm/cold transfer features with human detection and whisper messages
* Configuring transfer behavior directly in the OpenMic UI
**Webhook Mode is best for:**
* Dynamic routing based on real-time data (e.g., agent availability, time of day, customer priority)
* Integration with external systems (CRM, scheduling tools, queue management)
* Complex routing logic that requires backend processing
* A/B testing different transfer strategies
* Load balancing across multiple agents or departments
* Custom transfer logic implemented in your backend (you handle warm/cold transfer behavior in your code)
Be specific about when transfers should occur:
* User explicitly requests human assistance
* User expresses frustration or dissatisfaction
* Query is outside the AI's capabilities
* High-value or sensitive situations requiring human judgment
Warm transfers provide context to the receiving agent, resulting in:
* Better customer experience (no need to repeat information)
* More efficient handling by human agents
* Higher first-call resolution rates
Set detection timeouts based on your team's typical response patterns:
* **Fast-paced teams**: 15-20 seconds
* **Standard operations**: 30 seconds (default)
* **High-volume periods**: 45-60 seconds
***
## Example Use Cases
When a customer is upset or dissatisfied, automatically detect sentiment and transfer to a human agent with context about the issue.
**Setup:**
* Use warm transfer to provide context
* Enable human detection to ensure an agent answers
* Set whisper message: "Customer escalation - they are frustrated about billing issue"
* This allows the human agent to prepare before taking the call
When a prospect shows interest in purchasing, transfer to sales team with qualification details.
**Setup:**
* Configure warm transfer to sales team number
* Enable human agent confirmation to ensure availability
* Whisper message: "Qualified lead interested in enterprise plan"
* Three-way message: "I'm connecting you with our sales team now"
* This creates a smooth handoff with full context
Route calls to different departments based on customer intent.
**Setup:**
* Use dynamic routing with prompt-based destination
* Cold transfer for quick routing without AI intervention
* Routing logic: "Route to billing for payment issues, support for technical issues, sales for upgrades"
* Update your agent prompt to identify the correct department based on customer needs
Use webhook mode to route calls only to available agents in real-time.
**Setup:**
* Select Webhook mode
* Enable "Call a webhook before running this tool"
* Configure custom webhook URL pointing to your agent availability system
* Your webhook receives call data and returns the phone number of an available agent
* If no agents available, webhook can return an alternative action (e.g., voicemail, callback scheduling)
* This ensures customers are only transferred when an agent is ready to help
***
## Difference: Simple Agents vs Workflow Agents
**When to Use:**
* Dynamic, conversation-based transfers
* AI decides when to transfer based on conversation flow
* Multiple transfer functions for different scenarios
* Context-aware routing based on customer sentiment
**How It Works:**
* Agent uses AI to determine when conditions are met
* Triggered by conversation context and customer requests
* More flexible and adaptive
* Requires clear function descriptions
**When to Use:**
* Predetermined process with specific transfer points
* Transfer at specific steps in the workflow
* Automated, predictable routing
* Sequential call flows
**How It Works:**
* Transfer executed when workflow reaches the node
* Part of a structured, sequential process
* More controlled and predictable
* Can use workflow variables for routing decisions
***
## Troubleshooting
**Possible causes:**
* Invalid destination phone number format (use E.164 format: +\[country code]\[number])
* Detection timeout too short for agent to respond
* Human detection enabled but voicemail or IVR answered
**Solutions:**
* Verify phone number format
* Increase detection timeout
* Disable human detection if transferring to known IVR systems
**Possible causes:**
* Whisper message not enabled
* Agent answered but was placed on hold by their system
**Solutions:**
* Verify whisper message is enabled in settings
**Possible causes:**
* Detection timeout too short
* Background noise causing false positives
* Auto-greet disabled, resulting in silence
**Solutions:**
* Enable auto-greet to encourage response
* Increase detection timeout to 45-60 seconds
* Test in quiet environment first
**Possible causes:**
* Webhook URL is incorrect or unreachable
* Webhook server is down or slow to respond (timeout is 3 seconds)
* Pre-call webhook URL not configured in agent settings
**Solutions:**
* Verify the webhook URL is correct and accessible
* Optimize your webhook to respond within 3 seconds (OpenMic retries up to 3 times)
* If using "Use the pre-call webhook URL", ensure it's configured in your bot's main settings
* Check webhook logs for errors or timeouts
* Use custom webhook URL as an alternative if pre-call webhook is having issues
* If webhook fails, OpenMic will use the fallback transfer number you configured
See [Pre-tool Webhook retry logic](/pre-tool-webhook#retry-logic-and-error-handling) for more details.
**Possible causes:**
* Webhook logic not properly handling call context
* Missing or incorrect data in webhook payload
* Response format doesn't match expected structure
**Solutions:**
* Ensure your webhook returns `transfer_number` in the `dynamic_variables` object
* Review the [Pre-tool Webhook request/response format](/pre-tool-webhook#request-specification)
* Add logging to your webhook to debug what data is being received
* Verify the transfer number is in E.164 format (e.g., +1234567890)
* Test with different call scenarios to ensure routing logic covers all cases
***
## Need Help?
If you encounter issues or have questions about the Transfer Call function:
* Test the function with your own phone number first
* Review your call logs and workflow execution history
* Verify the phone number format is correct (E.164 format)
* Check that your transfer function description is clear (for Simple Agents)
* Ensure your workflow is saved and published (for Workflow Agents)
* For webhook issues, check your webhook logs and response format
For technical support or questions about call transfer configurations, contact our support team.
For warm transfers in static mode, you can configure advanced settings:
#### On-hold Music
Select the audio played to the caller while they are on hold during the transfer process. The default is a standard ringtone.
#### Navigate IVR
Toggle this setting if the transfer destination is an IVR system
Enable this to help the AI navigate automated phone systems when the transfer target has an IVR menu.
#### Human Detection
When enabled, the AI will only debrief if a real human is detected. It will not transfer if it detects a voicemail or non-human response.
**Detection Timeout**: Set the maximum time (default: 30s) the AI will wait to determine if the transfer target is a human.
**Auto-greet**: When checked, the AI will automatically say "Hello" at the start to encourage a response from the transfer target.
#### Whisper Message
If checked: spoken only to the transfer agent
Configure a private message that only the transfer target hears before connecting to the original caller. This can be:
* **Prompt**: Dynamic message generated by AI based on call context
* **Static Sentence**: Fixed message you define
Example: "Hey, a user is on the call"
#### Human Agent Confirmation
When enabled, the AI will ask the human agent for confirmation before transferring the call. This ensures the agent is ready and available to take the call.
If the agent declines or is unavailable, the transfer will be cancelled and the original caller will remain connected to the AI agent.
#### Three-way Message
If checked: spoken after transfer successful, both parties can hear
Configure a message spoken to both the transfer target and the original caller once the connection is established.
Choose between:
* **Prompt**: Dynamic message based on call context
* **Static Sentence**: Fixed message
Example: "Say both are connected"
***
## Configuration Best Practices
For Simple Agents, enhance the agent's understanding by incorporating transfer conditions into your bot's main prompt:
```
If the user is angry, frustrated, or requests to speak with a human,
use the transfer_call tool to transfer the conversation to a human agent.
```
This helps the AI understand when to automatically trigger the transfer function based on conversation context.
**When to Use Static Mode vs Webhook Mode:**
**Static Mode is best for:**
* Fixed transfer destinations that don't change
* Simple routing rules you can configure in the dashboard
* Quick setup without backend development
* Using built-in warm/cold transfer features with human detection and whisper messages
* Configuring transfer behavior directly in the OpenMic UI
**Webhook Mode is best for:**
* Dynamic routing based on real-time data (e.g., agent availability, time of day, customer priority)
* Integration with external systems (CRM, scheduling tools, queue management)
* Complex routing logic that requires backend processing
* A/B testing different transfer strategies
* Load balancing across multiple agents or departments
* Custom transfer logic implemented in your backend (you handle warm/cold transfer behavior in your code)
Be specific about when transfers should occur:
* User explicitly requests human assistance
* User expresses frustration or dissatisfaction
* Query is outside the AI's capabilities
* High-value or sensitive situations requiring human judgment
Warm transfers provide context to the receiving agent, resulting in:
* Better customer experience (no need to repeat information)
* More efficient handling by human agents
* Higher first-call resolution rates
Set detection timeouts based on your team's typical response patterns:
* **Fast-paced teams**: 15-20 seconds
* **Standard operations**: 30 seconds (default)
* **High-volume periods**: 45-60 seconds
***
## Example Use Cases
When a customer is upset or dissatisfied, automatically detect sentiment and transfer to a human agent with context about the issue.
**Setup:**
* Use warm transfer to provide context
* Enable human detection to ensure an agent answers
* Set whisper message: "Customer escalation - they are frustrated about billing issue"
* This allows the human agent to prepare before taking the call
When a prospect shows interest in purchasing, transfer to sales team with qualification details.
**Setup:**
* Configure warm transfer to sales team number
* Enable human agent confirmation to ensure availability
* Whisper message: "Qualified lead interested in enterprise plan"
* Three-way message: "I'm connecting you with our sales team now"
* This creates a smooth handoff with full context
Route calls to different departments based on customer intent.
**Setup:**
* Use dynamic routing with prompt-based destination
* Cold transfer for quick routing without AI intervention
* Routing logic: "Route to billing for payment issues, support for technical issues, sales for upgrades"
* Update your agent prompt to identify the correct department based on customer needs
Use webhook mode to route calls only to available agents in real-time.
**Setup:**
* Select Webhook mode
* Enable "Call a webhook before running this tool"
* Configure custom webhook URL pointing to your agent availability system
* Your webhook receives call data and returns the phone number of an available agent
* If no agents available, webhook can return an alternative action (e.g., voicemail, callback scheduling)
* This ensures customers are only transferred when an agent is ready to help
***
## Difference: Simple Agents vs Workflow Agents
**When to Use:**
* Dynamic, conversation-based transfers
* AI decides when to transfer based on conversation flow
* Multiple transfer functions for different scenarios
* Context-aware routing based on customer sentiment
**How It Works:**
* Agent uses AI to determine when conditions are met
* Triggered by conversation context and customer requests
* More flexible and adaptive
* Requires clear function descriptions
**When to Use:**
* Predetermined process with specific transfer points
* Transfer at specific steps in the workflow
* Automated, predictable routing
* Sequential call flows
**How It Works:**
* Transfer executed when workflow reaches the node
* Part of a structured, sequential process
* More controlled and predictable
* Can use workflow variables for routing decisions
***
## Troubleshooting
**Possible causes:**
* Invalid destination phone number format (use E.164 format: +\[country code]\[number])
* Detection timeout too short for agent to respond
* Human detection enabled but voicemail or IVR answered
**Solutions:**
* Verify phone number format
* Increase detection timeout
* Disable human detection if transferring to known IVR systems
**Possible causes:**
* Whisper message not enabled
* Agent answered but was placed on hold by their system
**Solutions:**
* Verify whisper message is enabled in settings
**Possible causes:**
* Detection timeout too short
* Background noise causing false positives
* Auto-greet disabled, resulting in silence
**Solutions:**
* Enable auto-greet to encourage response
* Increase detection timeout to 45-60 seconds
* Test in quiet environment first
**Possible causes:**
* Webhook URL is incorrect or unreachable
* Webhook server is down or slow to respond (timeout is 3 seconds)
* Pre-call webhook URL not configured in agent settings
**Solutions:**
* Verify the webhook URL is correct and accessible
* Optimize your webhook to respond within 3 seconds (OpenMic retries up to 3 times)
* If using "Use the pre-call webhook URL", ensure it's configured in your bot's main settings
* Check webhook logs for errors or timeouts
* Use custom webhook URL as an alternative if pre-call webhook is having issues
* If webhook fails, OpenMic will use the fallback transfer number you configured
See [Pre-tool Webhook retry logic](/pre-tool-webhook#retry-logic-and-error-handling) for more details.
**Possible causes:**
* Webhook logic not properly handling call context
* Missing or incorrect data in webhook payload
* Response format doesn't match expected structure
**Solutions:**
* Ensure your webhook returns `transfer_number` in the `dynamic_variables` object
* Review the [Pre-tool Webhook request/response format](/pre-tool-webhook#request-specification)
* Add logging to your webhook to debug what data is being received
* Verify the transfer number is in E.164 format (e.g., +1234567890)
* Test with different call scenarios to ensure routing logic covers all cases
***
## Need Help?
If you encounter issues or have questions about the Transfer Call function:
* Test the function with your own phone number first
* Review your call logs and workflow execution history
* Verify the phone number format is correct (E.164 format)
* Check that your transfer function description is clear (for Simple Agents)
* Ensure your workflow is saved and published (for Workflow Agents)
* For webhook issues, check your webhook logs and response format
For technical support or questions about call transfer configurations, contact our support team.