> ## Documentation Index
> Fetch the complete documentation index at: https://docs.openmic.ai/llms.txt
> Use this file to discover all available pages before exploring further.
# GoHighLevel Integration
> Connect your OpenMic assistant to GoHighLevel to manage contacts and book appointments directly within your calls.
export const ArcadeEmbed = ({url, title}) => {
return
;
};
The **GoHighLevel (GHL)** integration adds seamless CRM and scheduling capabilities to your OpenMic agents. With this integration, agents can connect directly with your clients' GoHighLevel accounts to retrieve existing contact information using the **Get Contact tool**, add new leads through the **Create Contact tool**, check available times with the **Check Availability tool**, and book appointments linked to those contacts using the **Create Event tool**. These tools work together to help your agents handle every part of the contact and appointment process, from the first call to a confirmed booking, all within the GoHighLevel environment.
## Interactive Demo
See the GoHighLevel integration in action:
***
## Prerequisites
Before connecting GoHighLevel with OpenMic, make sure you have the following:
1. **An active GoHighLevel account** with access to the workspace you want to connect.
2. **An OpenMic account** with at least one agent created.
3. Access to the **OpenMic Dashboard**, where you can configure integrations and custom functions.
***
## Step 1: Connect Your GoHighLevel Account
To begin, connect your GoHighLevel account from the OpenMic Dashboard.
1. Go to the **Integrations** section in your [OpenMic Dashboard](https://app.openmic.ai).
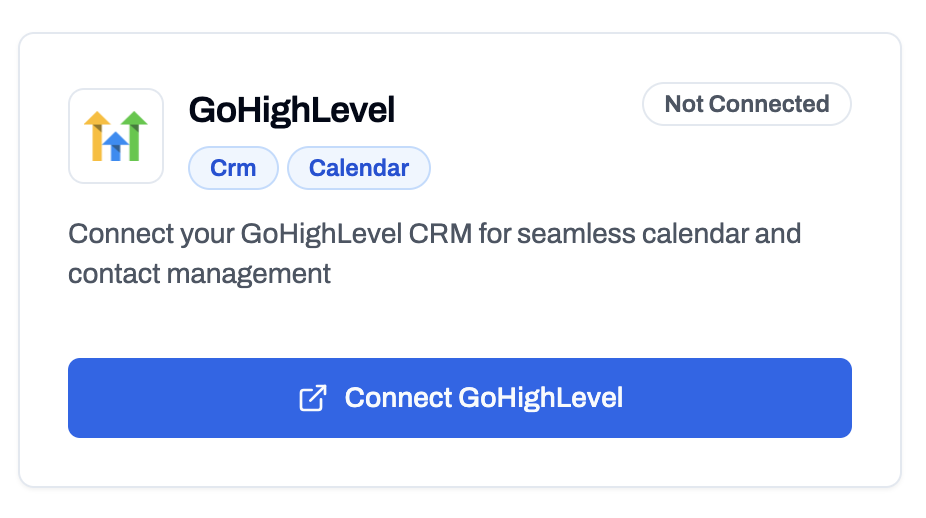
2. Locate the **GoHighLevel** card.
3. Click **Connect GoHighLevel**.
4. A secure GoHighLevel login popup will appear.
5. Log in and approve access to allow OpenMic to manage your GHL contacts.
During this step, OpenMic will request permission to access your GoHighLevel account so it can manage your contacts and calendar on your behalf.
 ***
## Step 2: Add GoHighLevel Tools to an Agent
Once connected, you can create GHL tools directly inside your agent's settings.
1. Navigate to **Dashboard → Simple Agents**.
2. Select or create an agent.
3. Open the **Custom Functions** tab.
4. Click **Add Function**.
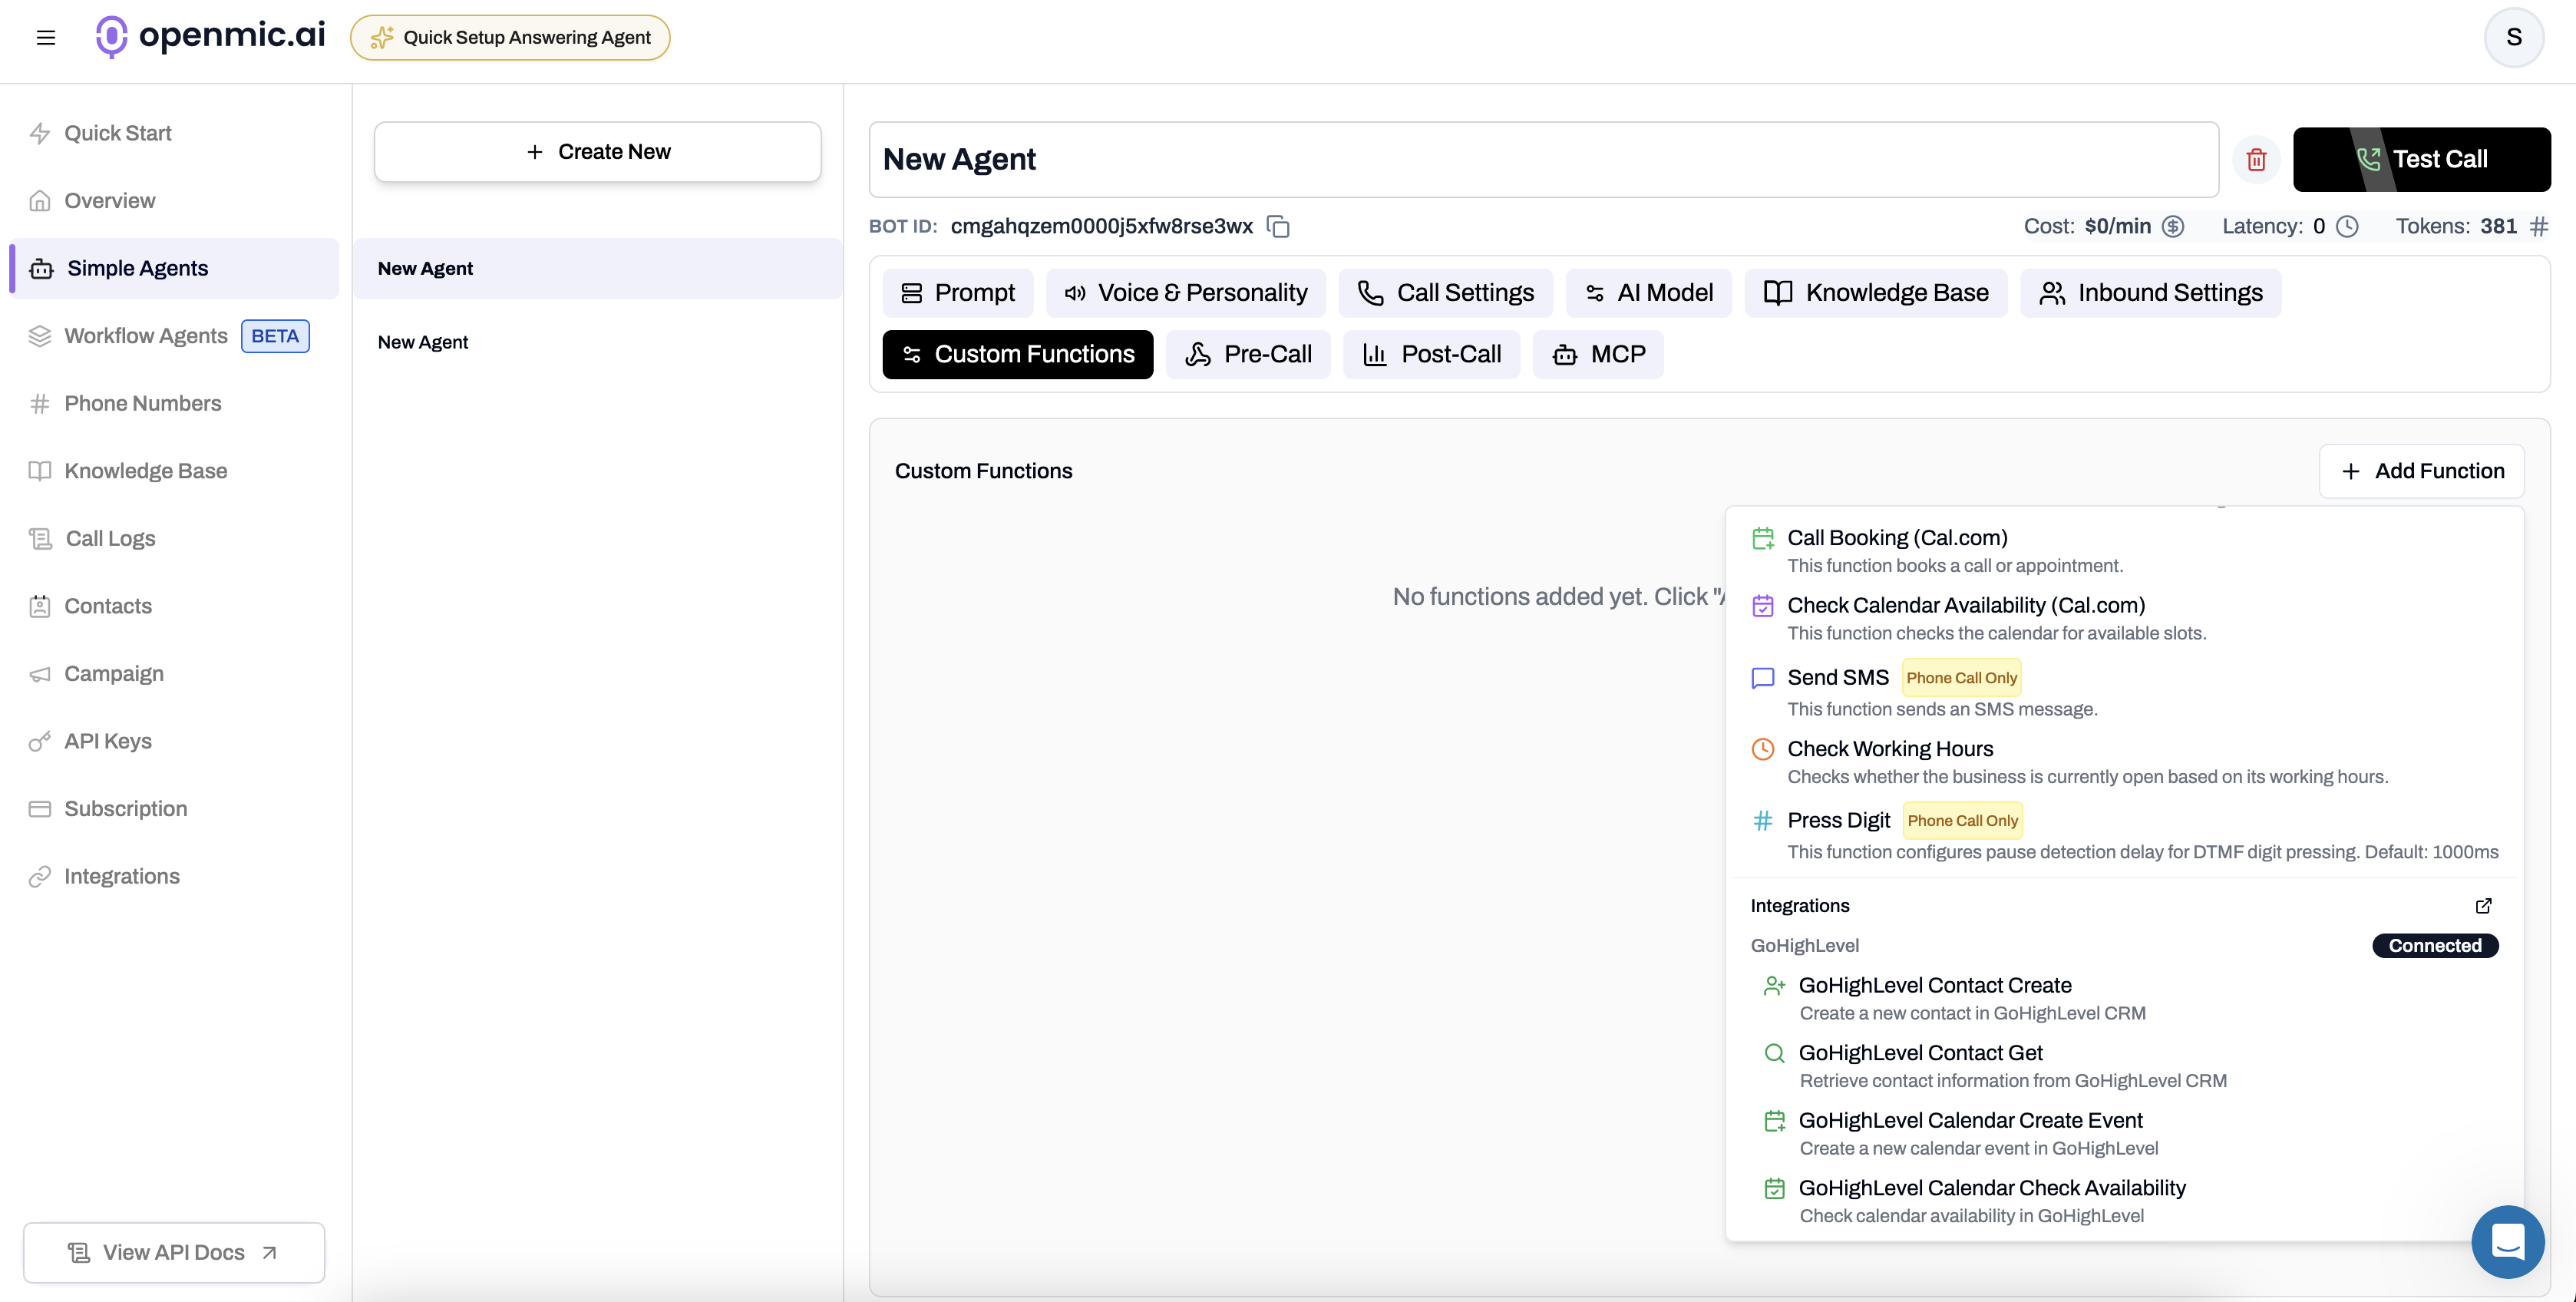
5. From the list, choose from the available GoHighLevel tools:
* **GoHighLevel Contact Get** - Look up existing contacts
* **GoHighLevel Contact Create** - Create new contacts
* **GoHighLevel Check Availability** - Check available appointment slots
* **GoHighLevel Create Event** - Book appointments
***
## Step 2: Add GoHighLevel Tools to an Agent
Once connected, you can create GHL tools directly inside your agent's settings.
1. Navigate to **Dashboard → Simple Agents**.
2. Select or create an agent.
3. Open the **Custom Functions** tab.
4. Click **Add Function**.
5. From the list, choose from the available GoHighLevel tools:
* **GoHighLevel Contact Get** - Look up existing contacts
* **GoHighLevel Contact Create** - Create new contacts
* **GoHighLevel Check Availability** - Check available appointment slots
* **GoHighLevel Create Event** - Book appointments
 6. For **Create Contact** or **Get Contact**, you'll see a field labeled **Test Phone Number (for web calls)**.
* During **web call testing**, you can enter a phone number manually here.
* During **live calls**, the caller's number is used automatically.
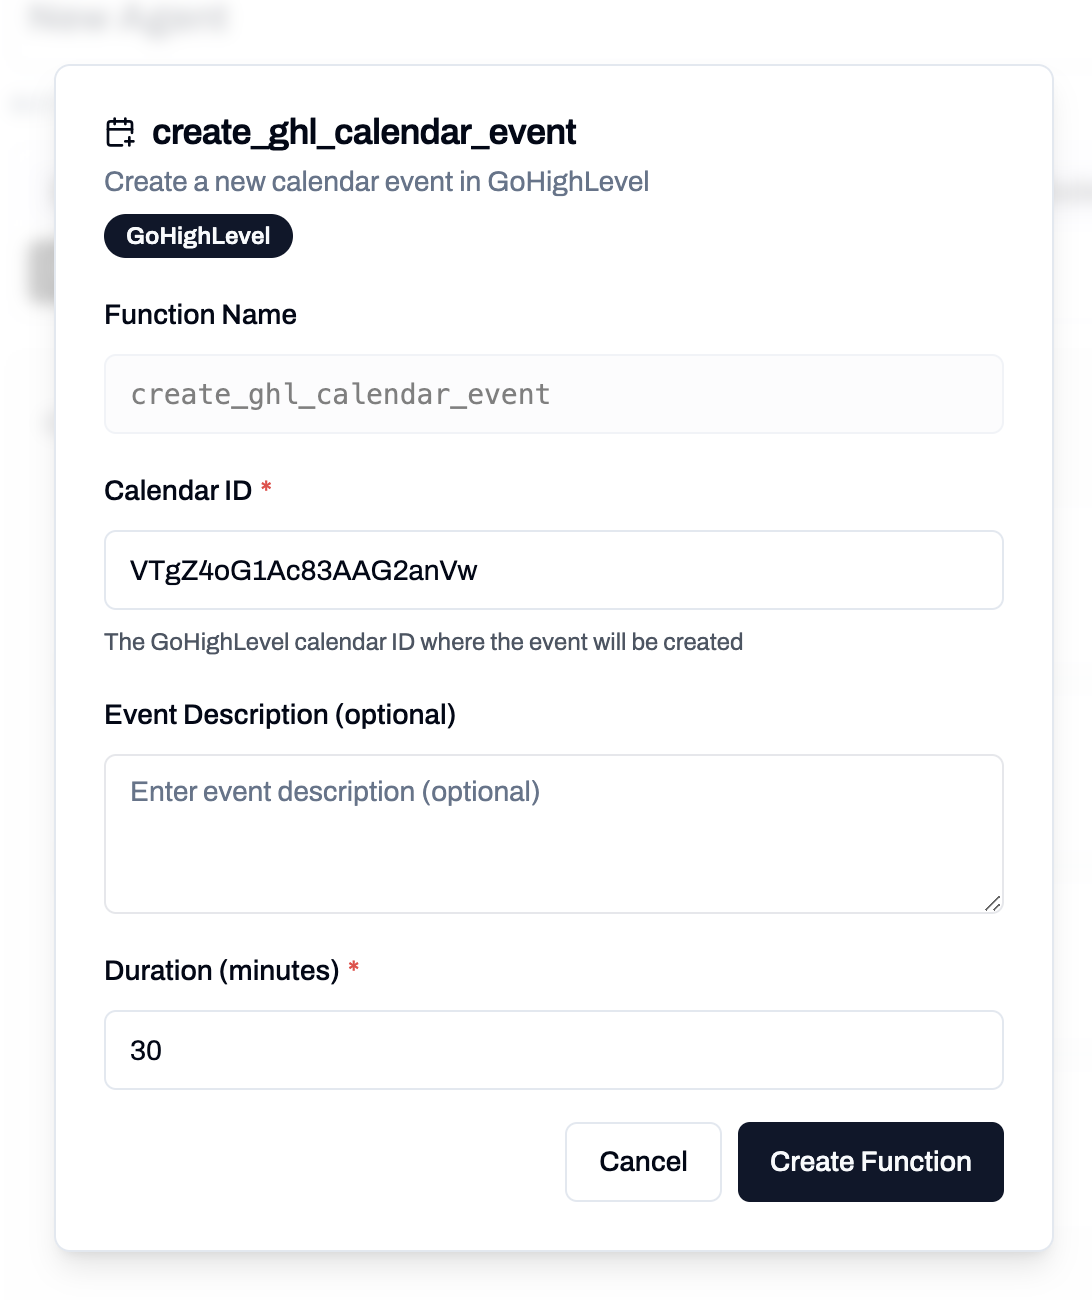
7. For **Check Availability** and **Create Event** tools, you'll need to provide a **Calendar ID**:
* Log in to your GoHighLevel account
* Navigate to **Settings → Calendars**
* Each calendar listed will display its unique ID
* Copy the Calendar ID and paste it into the tool configuration
8. Click **Create Function** to add the selected tool to your current agent.
For a complete appointment booking workflow, add all four tools to your agent:\
**Get Contact**, **Create Contact**, **Check Availability**, and **Create Event**.\
This enables your assistant to handle the entire process from contact management to confirmed bookings.
That's it — no extra setup needed.\
Once added, your agent can now create and fetch contacts, check availability, and book appointments in real time during calls.
6. For **Create Contact** or **Get Contact**, you'll see a field labeled **Test Phone Number (for web calls)**.
* During **web call testing**, you can enter a phone number manually here.
* During **live calls**, the caller's number is used automatically.
7. For **Check Availability** and **Create Event** tools, you'll need to provide a **Calendar ID**:
* Log in to your GoHighLevel account
* Navigate to **Settings → Calendars**
* Each calendar listed will display its unique ID
* Copy the Calendar ID and paste it into the tool configuration
8. Click **Create Function** to add the selected tool to your current agent.
For a complete appointment booking workflow, add all four tools to your agent:\
**Get Contact**, **Create Contact**, **Check Availability**, and **Create Event**.\
This enables your assistant to handle the entire process from contact management to confirmed bookings.
That's it — no extra setup needed.\
Once added, your agent can now create and fetch contacts, check availability, and book appointments in real time during calls.
 ***
## Step 3: Configure Assistant System Prompt
After adding the GoHighLevel tools to your assistant, it's important to provide a clear **system prompt**.
This tells your assistant **how** and **when** to use each GoHighLevel tool during conversations.
Here's a simple example you can use or modify:
```text theme={null}
You are a professional appointment scheduling assistant for [Your Company Name]. Your role is to provide a seamless booking experience while maintaining accurate contact records in GoHighLevel.
Today's date and time is {{now.est}}.
Your Approach:
Start every call with a warm greeting and collect the caller's name and email address. Once you have their information, look them up using `ghl_lookup_contact` to see if they're already in the system. If they're new, create their profile with `create_ghl_contact` so you have a contact ID to work with.
With their contact established, move into scheduling. Ask about their preferred appointment time, then use `check_ghl_calendar_availability` to see what's open. If their first choice isn't available, present 2-3 alternative time slots and let them pick what works best. Once they've settled on a time, finalize the booking with `create_ghl_calendar_event`.
Before ending the call, confirm all the appointment details clearly—date, time, and any relevant notes. Keep the conversation natural and helpful throughout.
Key Rules:
- Always check if a contact exists before creating a new one
- You must have a valid contact ID before booking appointments
- Always verify availability before confirming appointment times
- Offer 2-3 alternative time slots when the requested time isn't available
```
**Important: Always include today's date in your system prompt when using appointment tools.**
Without it, the AI may hallucinate the wrong year — for example, interpreting "March 13th" as 2024 instead of 2026.
Add `{{now.est}}` (or your business timezone like `{{now.cst}}`, `{{now.pst}}`, etc.) to your prompt so the assistant always knows the current date and time.
See [Dynamic Variables](/dynamic-variables) for all available timezone options.
***
## Complete Appointment Booking Workflow
Here's how all four GoHighLevel tools work together for a seamless appointment booking experience:
### Workflow Steps
1. **Contact Lookup** - The assistant uses **Get Contact** to check if the caller exists in your GoHighLevel CRM
* If found: Retrieves the contact ID and existing details
* If not found: Proceeds to step 2
2. **Contact Creation** - If needed, the assistant uses **Create Contact** to add the caller as a new contact
* Collects: First name, last name, email, phone number
* Returns a new contact ID for use in booking
3. **Check Available Times** - The assistant uses **Check Availability** to find open slots
* Queries your GoHighLevel calendar using the Calendar ID
* Presents available time options to the caller
* Helps the caller select a convenient time
4. **Book the Appointment** - Finally, the assistant uses **Create Event** to confirm the booking
* Links the event to the contact ID (from step 1 or 2)
* Creates the appointment in your GoHighLevel calendar
* Triggers any GoHighLevel automations (confirmations, reminders, etc.)
### Example Conversation Flow
```
Assistant: "Hi! I'd be happy to help you schedule an appointment. May I have your
full name and email address?"
Caller: "Sure, it's John Smith, john@example.com"
[Assistant uses Get Contact tool - contact not found]
[Assistant uses Create Contact tool to add John Smith]
Assistant: "Thank you! Let me create your account... Perfect. Now, when would you
like to schedule your appointment?"
Caller: "Is next Tuesday at 2 PM available?"
[Assistant uses Check Availability tool]
Assistant: "I see that Tuesday at 2 PM is available. Let me book that for you."
[Assistant uses Create Event tool]
Assistant: "All set! I've scheduled your appointment for Tuesday at 2 PM. You'll receive
a confirmation email shortly. Is there anything else I can help you with?"
```
***
## Tool Configurations
### GoHighLevel Get Contact Tool
This tool helps the assistant check if the caller already exists in your GoHighLevel account. It prevents duplicates and allows the agent to pull up existing contact details quickly.
**Input**
* `phone`: The phone number of the caller to look up in GoHighLevel.
**How it works**
If the phone number matches an existing contact, the tool returns their saved details (like name, phone, and contact ID) so the agent can continue the conversation with context.
***
### GoHighLevel Create Contact Tool
This tool lets the assistant add a new contact in GoHighLevel when no existing record is found. It's used for new callers or leads that aren't already saved.
**Input**
* `firstName`: The contact's first name.
* `lastName`: The contact's last name.
* `email`: The contact's email address.
* `phone`: The contact's phone number.
**How it works**
When triggered, it creates a new record inside your connected GoHighLevel workspace and returns the new contact ID, which can later be used for follow-up actions or scheduling.
***
### GoHighLevel Check Availability Tool
This tool allows your assistant to check available appointment slots in a specific GoHighLevel calendar. Use this before booking appointments to ensure the requested time is available.
**Input**
* `calendarId`: The unique identifier for your GoHighLevel calendar (required).
* `startDate`: The start date/time to begin checking availability (ISO 8601 format).
* `endDate`: The end date/time to stop checking availability (ISO 8601 format).
**How it works**
The tool queries the specified GoHighLevel calendar and returns available time slots within the requested date range. Your assistant can then present these options to the caller and help them choose a suitable time.
**Finding your Calendar ID**
1. Log in to your GoHighLevel account
2. Navigate to **Settings → Calendars**
3. Each calendar will display its unique Calendar ID
4. Copy this ID and use it when configuring the Check Availability tool
***
### GoHighLevel Create Event Tool
This tool enables your assistant to book appointments directly in your GoHighLevel calendar. It should be used after confirming a contact exists and verifying time slot availability.
**Input**
* `calendarId`: The unique identifier for your GoHighLevel calendar (required).
* `contactId`: The GoHighLevel contact ID to associate with the appointment (obtained from Get Contact or Create Contact tools).
* `startTime`: The appointment start time (ISO 8601 format).
* `endTime`: The appointment end time (ISO 8601 format).
* `title`: A title or description for the appointment.
**How it works**
When triggered, the tool creates a new event in the specified GoHighLevel calendar and links it to the contact. The appointment will appear in your GoHighLevel calendar and any associated automations (like confirmation emails) will be triggered according to your GoHighLevel settings.
**Important Notes**
* Always obtain a valid `contactId` before creating an event (use Get Contact or Create Contact first)
* Always check availability before booking (use Check Availability tool first)
* The `calendarId` must match the calendar where you want to book the appointment
***
## Step 3: Configure Assistant System Prompt
After adding the GoHighLevel tools to your assistant, it's important to provide a clear **system prompt**.
This tells your assistant **how** and **when** to use each GoHighLevel tool during conversations.
Here's a simple example you can use or modify:
```text theme={null}
You are a professional appointment scheduling assistant for [Your Company Name]. Your role is to provide a seamless booking experience while maintaining accurate contact records in GoHighLevel.
Today's date and time is {{now.est}}.
Your Approach:
Start every call with a warm greeting and collect the caller's name and email address. Once you have their information, look them up using `ghl_lookup_contact` to see if they're already in the system. If they're new, create their profile with `create_ghl_contact` so you have a contact ID to work with.
With their contact established, move into scheduling. Ask about their preferred appointment time, then use `check_ghl_calendar_availability` to see what's open. If their first choice isn't available, present 2-3 alternative time slots and let them pick what works best. Once they've settled on a time, finalize the booking with `create_ghl_calendar_event`.
Before ending the call, confirm all the appointment details clearly—date, time, and any relevant notes. Keep the conversation natural and helpful throughout.
Key Rules:
- Always check if a contact exists before creating a new one
- You must have a valid contact ID before booking appointments
- Always verify availability before confirming appointment times
- Offer 2-3 alternative time slots when the requested time isn't available
```
**Important: Always include today's date in your system prompt when using appointment tools.**
Without it, the AI may hallucinate the wrong year — for example, interpreting "March 13th" as 2024 instead of 2026.
Add `{{now.est}}` (or your business timezone like `{{now.cst}}`, `{{now.pst}}`, etc.) to your prompt so the assistant always knows the current date and time.
See [Dynamic Variables](/dynamic-variables) for all available timezone options.
***
## Complete Appointment Booking Workflow
Here's how all four GoHighLevel tools work together for a seamless appointment booking experience:
### Workflow Steps
1. **Contact Lookup** - The assistant uses **Get Contact** to check if the caller exists in your GoHighLevel CRM
* If found: Retrieves the contact ID and existing details
* If not found: Proceeds to step 2
2. **Contact Creation** - If needed, the assistant uses **Create Contact** to add the caller as a new contact
* Collects: First name, last name, email, phone number
* Returns a new contact ID for use in booking
3. **Check Available Times** - The assistant uses **Check Availability** to find open slots
* Queries your GoHighLevel calendar using the Calendar ID
* Presents available time options to the caller
* Helps the caller select a convenient time
4. **Book the Appointment** - Finally, the assistant uses **Create Event** to confirm the booking
* Links the event to the contact ID (from step 1 or 2)
* Creates the appointment in your GoHighLevel calendar
* Triggers any GoHighLevel automations (confirmations, reminders, etc.)
### Example Conversation Flow
```
Assistant: "Hi! I'd be happy to help you schedule an appointment. May I have your
full name and email address?"
Caller: "Sure, it's John Smith, john@example.com"
[Assistant uses Get Contact tool - contact not found]
[Assistant uses Create Contact tool to add John Smith]
Assistant: "Thank you! Let me create your account... Perfect. Now, when would you
like to schedule your appointment?"
Caller: "Is next Tuesday at 2 PM available?"
[Assistant uses Check Availability tool]
Assistant: "I see that Tuesday at 2 PM is available. Let me book that for you."
[Assistant uses Create Event tool]
Assistant: "All set! I've scheduled your appointment for Tuesday at 2 PM. You'll receive
a confirmation email shortly. Is there anything else I can help you with?"
```
***
## Tool Configurations
### GoHighLevel Get Contact Tool
This tool helps the assistant check if the caller already exists in your GoHighLevel account. It prevents duplicates and allows the agent to pull up existing contact details quickly.
**Input**
* `phone`: The phone number of the caller to look up in GoHighLevel.
**How it works**
If the phone number matches an existing contact, the tool returns their saved details (like name, phone, and contact ID) so the agent can continue the conversation with context.
***
### GoHighLevel Create Contact Tool
This tool lets the assistant add a new contact in GoHighLevel when no existing record is found. It's used for new callers or leads that aren't already saved.
**Input**
* `firstName`: The contact's first name.
* `lastName`: The contact's last name.
* `email`: The contact's email address.
* `phone`: The contact's phone number.
**How it works**
When triggered, it creates a new record inside your connected GoHighLevel workspace and returns the new contact ID, which can later be used for follow-up actions or scheduling.
***
### GoHighLevel Check Availability Tool
This tool allows your assistant to check available appointment slots in a specific GoHighLevel calendar. Use this before booking appointments to ensure the requested time is available.
**Input**
* `calendarId`: The unique identifier for your GoHighLevel calendar (required).
* `startDate`: The start date/time to begin checking availability (ISO 8601 format).
* `endDate`: The end date/time to stop checking availability (ISO 8601 format).
**How it works**
The tool queries the specified GoHighLevel calendar and returns available time slots within the requested date range. Your assistant can then present these options to the caller and help them choose a suitable time.
**Finding your Calendar ID**
1. Log in to your GoHighLevel account
2. Navigate to **Settings → Calendars**
3. Each calendar will display its unique Calendar ID
4. Copy this ID and use it when configuring the Check Availability tool
***
### GoHighLevel Create Event Tool
This tool enables your assistant to book appointments directly in your GoHighLevel calendar. It should be used after confirming a contact exists and verifying time slot availability.
**Input**
* `calendarId`: The unique identifier for your GoHighLevel calendar (required).
* `contactId`: The GoHighLevel contact ID to associate with the appointment (obtained from Get Contact or Create Contact tools).
* `startTime`: The appointment start time (ISO 8601 format).
* `endTime`: The appointment end time (ISO 8601 format).
* `title`: A title or description for the appointment.
**How it works**
When triggered, the tool creates a new event in the specified GoHighLevel calendar and links it to the contact. The appointment will appear in your GoHighLevel calendar and any associated automations (like confirmation emails) will be triggered according to your GoHighLevel settings.
**Important Notes**
* Always obtain a valid `contactId` before creating an event (use Get Contact or Create Contact first)
* Always check availability before booking (use Check Availability tool first)
* The `calendarId` must match the calendar where you want to book the appointment