> ## Documentation Index
> Fetch the complete documentation index at: https://docs.openmic.ai/llms.txt
> Use this file to discover all available pages before exploring further.
# Call Booking Tutorial
> A quick tutorial to enable appointment booking - your AI collects details and creates confirmed bookings in Cal.com
export const ArcadeEmbed = ({url, title}) => {
return
;
};
## What is Call Booking?
With **Call Booking**, your AI agent can automatically schedule appointments in your Cal.com calendar while talking with customers.
**Example:**
* Customer: "I'd like to book an appointment for Tuesday at 2 PM"
* AI collects their name and email
* AI creates the booking in your calendar
* Customer gets a confirmation email
* Done! No manual scheduling needed.
***
## 🎮 Interactive Demo
Watch how to set up appointment booking:
***
## 🛠 Step-by-Step Instructions
### Step 1: Get Your Cal.com Details
Before you start, you'll need a Cal.com account.
**What you'll need:**
* Your Cal.com **username** (e.g., if your link is `cal.com/john`, your username is `john`)
* Find it at [your Cal.com profile page](https://app.cal.com/settings/my-account/profile)
* Or your **organization slug** (e.g., if your team URL is `acme.cal.com`, it's `acme`)
Don't have Cal.com yet? Sign up for free at [cal.com](https://cal.com)
**First time using Cal.com?** Make sure you've created at least one event type in your calendar. Go to [Event Types](https://app.cal.com/event-types) and create one (like "30 Minute Meeting") before continuing.
***
### Step 2: Go to Simple Agents
1. Open your OpenMic dashboard
2. Click **Simple Agents** in the sidebar
3. Select your agent
***
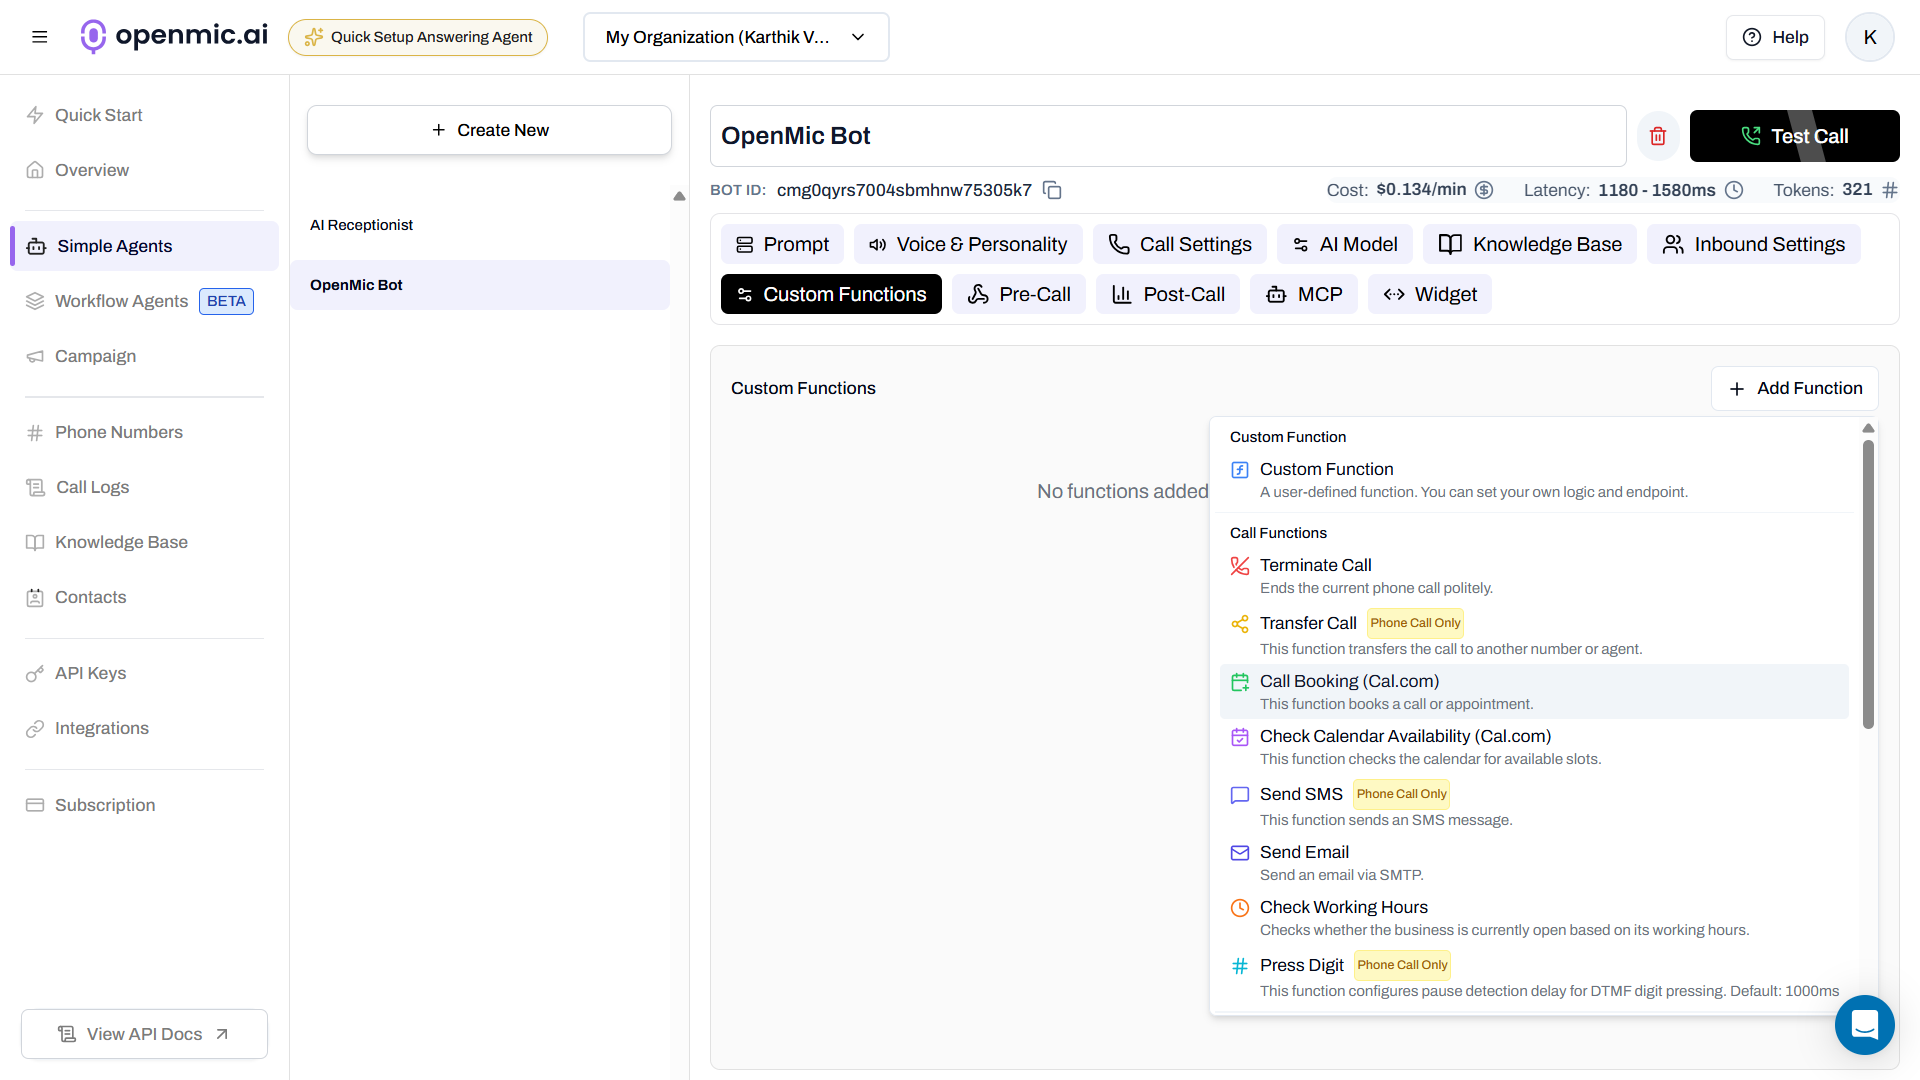
### Step 3: Open Custom Functions Tab
Click the **Custom Functions** tab at the top.
***
### Step 4: Add Call Booking Function
1. Click **Add Function**
2. Select **Call Booking** from the list
 ***
### Step 5: Choose Static Mode (Easy Setup)
When the configuration popup appears:
1. Select **Static Mode** (no API key needed!)
2. Enter your Cal.com username or organization slug
3. Click **Fetch Event Types**
***
### Step 6: Select Your Event Type
You'll see a dropdown with your calendar types (like "30 Min Meeting", "Consultation", etc.)
**Choose the event type** you want to book.
**What's an event type?**\
It's the type of appointment in your Cal.com calendar - like a 30-minute call, 1-hour consultation, etc.
Click **Next** to continue.
***
### Step 7: Configure the Function
Fill in these fields:
**Function Name:** `book_appointment`\
(Use underscores, no spaces)
**Description:** `Use this when the customer wants to book an appointment`
**Timezone (optional):** Your timezone like `America/New_York`
***
### Step 8: Save the Function
Click **Create Function** at the bottom.
***
### Step 9: Update Your Agent Prompt
Tell your AI when to use the booking function:
1. Go to the **Configuration** tab
2. Add this to your agent's prompt:
```
When a customer confirms they want to book an appointment and provides
their preferred time, use the book_appointment function. Make sure to
collect their name and email address first.
```
***
### Step 10: Test It!
1. Call your AI agent
2. Say: "I'd like to book an appointment for Tuesday at 2 PM"
3. AI will ask for your name and email
4. AI creates the booking
5. You get a confirmation email!
**Example conversation:**
```
Customer: "I'd like to book for Tuesday at 2 PM"
AI: "Perfect! May I have your name and email?"
Customer: "John Smith, john@example.com"
AI: "Great! I've booked your appointment for Tuesday at 2:00 PM.
You'll receive a confirmation email shortly!"
```
Use your own email first to see how the booking confirmation works!
***
### 💡 Pro Tip
**Combine with Calendar Check**: Add the **Check Calendar Availability** function to your agent too! This way, when customers ask "When are you available?", your AI can show them open time slots. Then once they pick a time, it uses the booking function to confirm it. This gives a much better experience and avoids double-booking.
### Step 1: Get Your Cal.com Details
Before you start, you'll need a Cal.com account.
**What you'll need:**
* Your Cal.com **username** (e.g., if your link is `cal.com/john`, your username is `john`)
* Find it at [your Cal.com profile page](https://app.cal.com/settings/my-account/profile)
* Or your **organization slug** (e.g., if your team URL is `acme.cal.com`, it's `acme`)
Don't have Cal.com yet? Sign up for free at [cal.com](https://cal.com)
**First time using Cal.com?** Make sure you've created at least one event type in your calendar. Go to [Event Types](https://app.cal.com/event-types) and create one (like "30 Minute Meeting") before continuing.
***
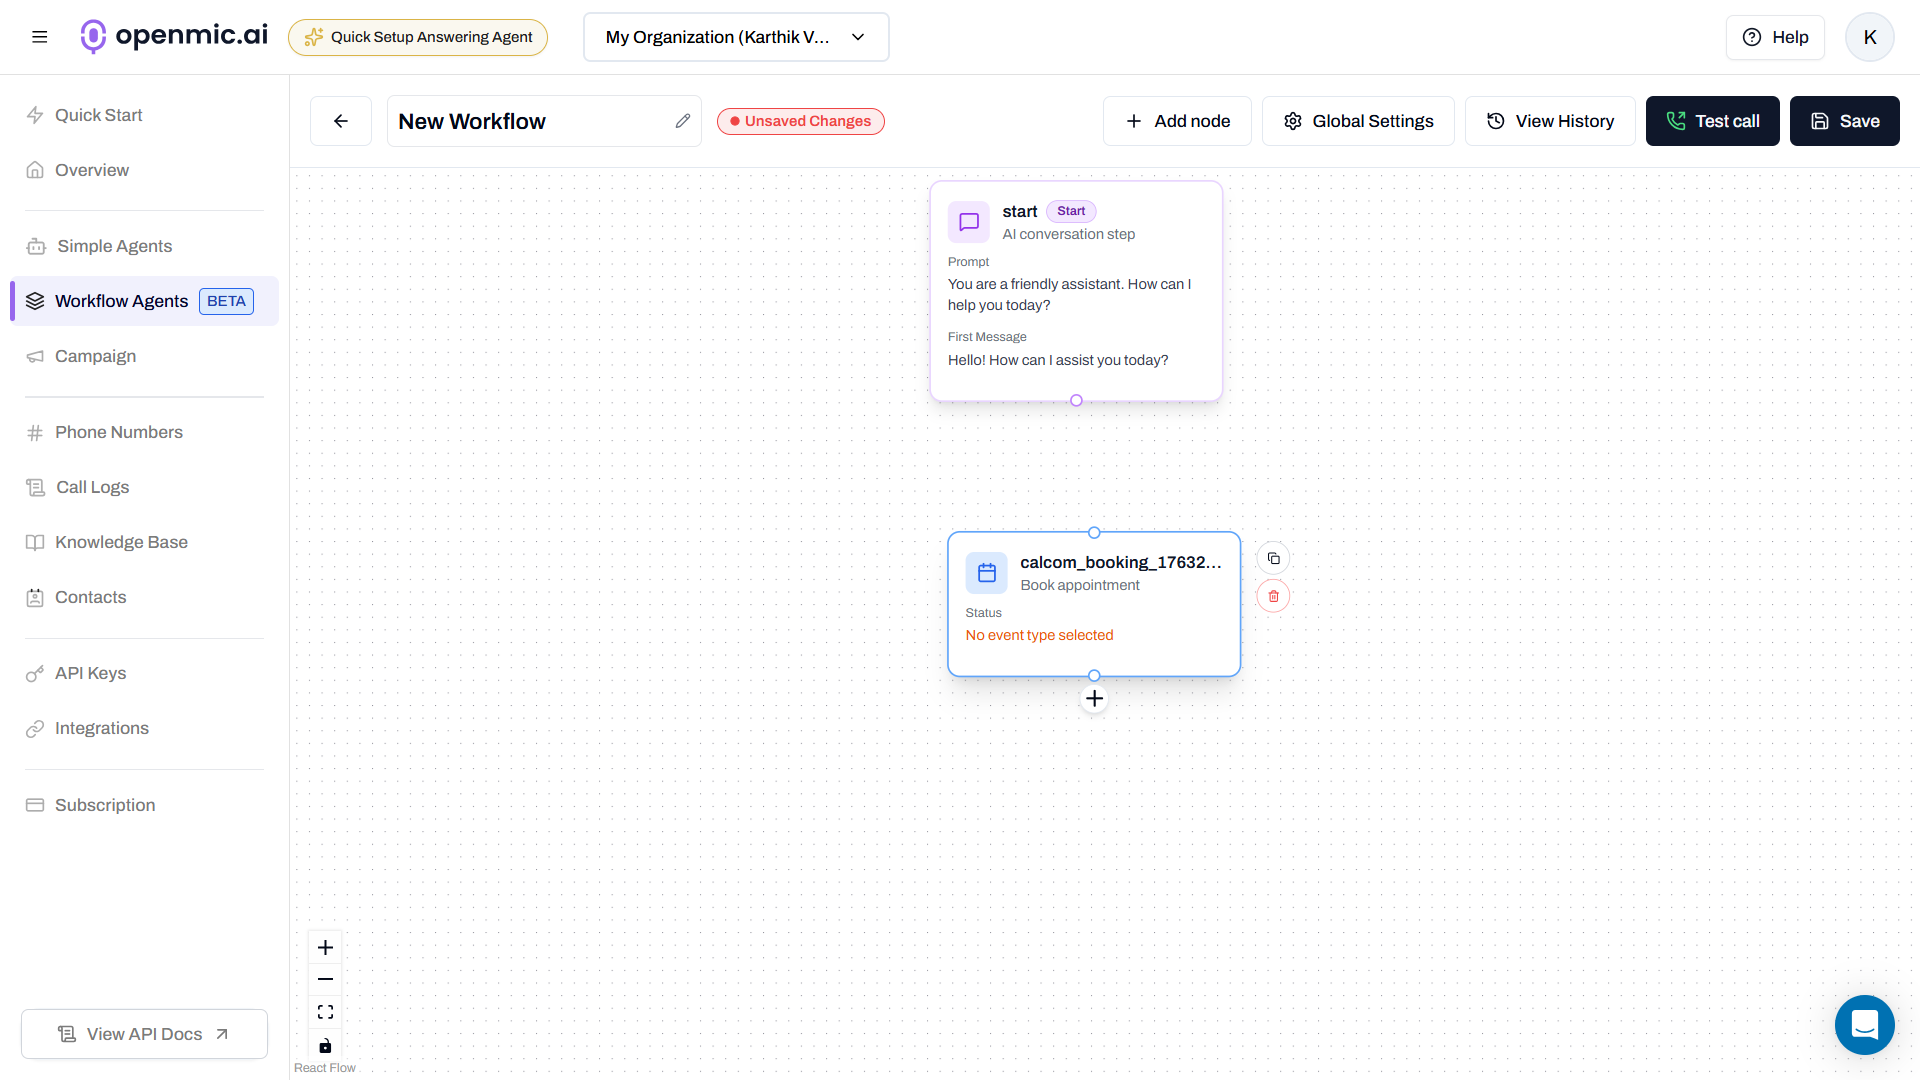
### Step 2: Go to Workflow Agents
1. Open your OpenMic dashboard
2. Click **Workflow Agents** in the sidebar
3. Click **Create New Workflow** (or select an existing one)
***
### Step 3: Add a Cal.com Booking Node
In the workflow editor:
1. Click the **+ Add Node** button
2. Select **Cal.com Booking** from the list
***
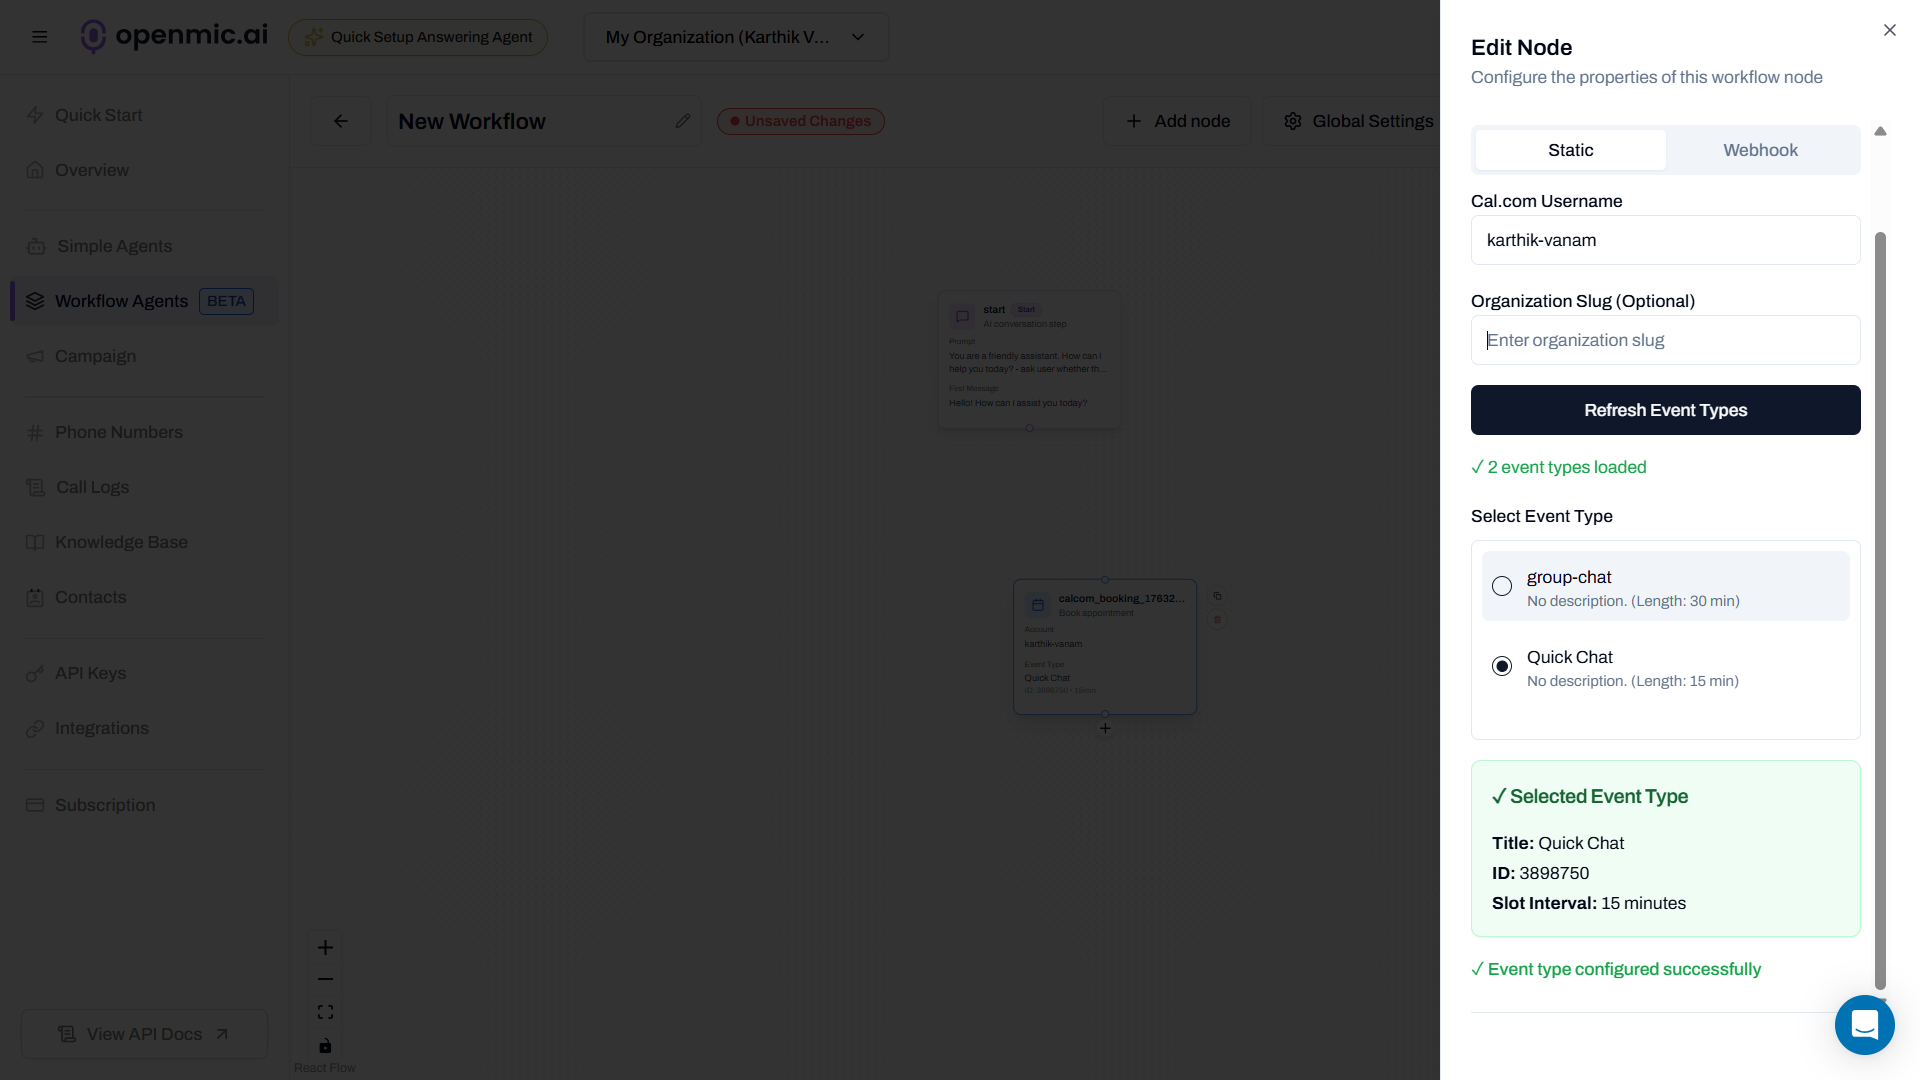
### Step 5: Choose Static Mode (Easy Setup)
When the configuration popup appears:
1. Select **Static Mode** (no API key needed!)
2. Enter your Cal.com username or organization slug
3. Click **Fetch Event Types**
***
### Step 6: Select Your Event Type
You'll see a dropdown with your calendar types (like "30 Min Meeting", "Consultation", etc.)
**Choose the event type** you want to book.
**What's an event type?**\
It's the type of appointment in your Cal.com calendar - like a 30-minute call, 1-hour consultation, etc.
Click **Next** to continue.
***
### Step 7: Configure the Function
Fill in these fields:
**Function Name:** `book_appointment`\
(Use underscores, no spaces)
**Description:** `Use this when the customer wants to book an appointment`
**Timezone (optional):** Your timezone like `America/New_York`
***
### Step 8: Save the Function
Click **Create Function** at the bottom.
***
### Step 9: Update Your Agent Prompt
Tell your AI when to use the booking function:
1. Go to the **Configuration** tab
2. Add this to your agent's prompt:
```
When a customer confirms they want to book an appointment and provides
their preferred time, use the book_appointment function. Make sure to
collect their name and email address first.
```
***
### Step 10: Test It!
1. Call your AI agent
2. Say: "I'd like to book an appointment for Tuesday at 2 PM"
3. AI will ask for your name and email
4. AI creates the booking
5. You get a confirmation email!
**Example conversation:**
```
Customer: "I'd like to book for Tuesday at 2 PM"
AI: "Perfect! May I have your name and email?"
Customer: "John Smith, john@example.com"
AI: "Great! I've booked your appointment for Tuesday at 2:00 PM.
You'll receive a confirmation email shortly!"
```
Use your own email first to see how the booking confirmation works!
***
### 💡 Pro Tip
**Combine with Calendar Check**: Add the **Check Calendar Availability** function to your agent too! This way, when customers ask "When are you available?", your AI can show them open time slots. Then once they pick a time, it uses the booking function to confirm it. This gives a much better experience and avoids double-booking.
### Step 1: Get Your Cal.com Details
Before you start, you'll need a Cal.com account.
**What you'll need:**
* Your Cal.com **username** (e.g., if your link is `cal.com/john`, your username is `john`)
* Find it at [your Cal.com profile page](https://app.cal.com/settings/my-account/profile)
* Or your **organization slug** (e.g., if your team URL is `acme.cal.com`, it's `acme`)
Don't have Cal.com yet? Sign up for free at [cal.com](https://cal.com)
**First time using Cal.com?** Make sure you've created at least one event type in your calendar. Go to [Event Types](https://app.cal.com/event-types) and create one (like "30 Minute Meeting") before continuing.
***
### Step 2: Go to Workflow Agents
1. Open your OpenMic dashboard
2. Click **Workflow Agents** in the sidebar
3. Click **Create New Workflow** (or select an existing one)
***
### Step 3: Add a Cal.com Booking Node
In the workflow editor:
1. Click the **+ Add Node** button
2. Select **Cal.com Booking** from the list
 ***
### Step 4: Choose Static Mode (Easy Setup)
When the configuration popup appears:
1. Select **Static Mode** (no API key needed!)
2. Enter your Cal.com username or organization slug
***
### Step 4: Choose Static Mode (Easy Setup)
When the configuration popup appears:
1. Select **Static Mode** (no API key needed!)
2. Enter your Cal.com username or organization slug
 ***
### Step 5: Fetch and Select Your Event Type
1. Click **Fetch Event Types**
2. You'll see a dropdown with your calendar types (like "30 Min Meeting", "Consultation", etc.)
3. Choose the event type you want to book
**What's an event type?**\
It's the type of appointment in your Cal.com calendar - like a 30-minute call, 1-hour consultation, etc.
***
### Step 6: Connect the Node
***
### Step 5: Fetch and Select Your Event Type
1. Click **Fetch Event Types**
2. You'll see a dropdown with your calendar types (like "30 Min Meeting", "Consultation", etc.)
3. Choose the event type you want to book
**What's an event type?**\
It's the type of appointment in your Cal.com calendar - like a 30-minute call, 1-hour consultation, etc.
***
### Step 6: Connect the Node
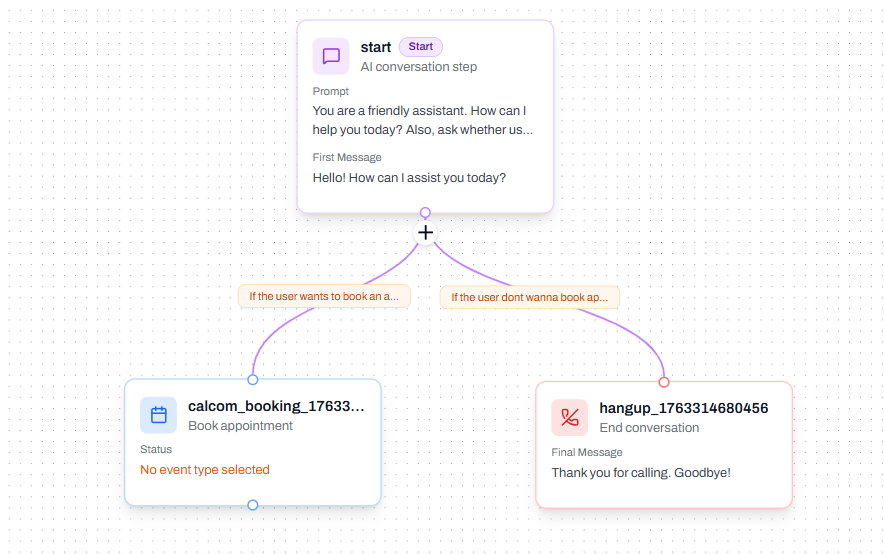 After configuring the node:
1. Drag a line from another node to connect it to your booking node
2. Click on the connection line between the nodes
3. Set the **transition condition** - this tells your workflow when to move to the booking step
**Example condition:**\
"When the customer confirms they want to book an appointment"
***
### Step 7: Save Your Workflow
Click **Save** in the top right corner.
***
### Step 8: Test It!
1. Start a conversation with your workflow agent
2. When the workflow reaches the booking step, it will automatically:
* Collect customer's name and email
* Book the appointment
* Send confirmation email
**Example conversation:**
```
Customer: "I'd like to book for Tuesday at 2 PM"
AI: "Perfect! May I have your name and email?"
Customer: "John Smith, john@example.com"
AI: "Great! I've booked your appointment for Tuesday at 2:00 PM.
You'll receive a confirmation email shortly!"
```
The booking happens automatically when your workflow reaches this step!
***
## 💡 Quick Reminder
**Static mode** uses public event types. Make sure your event type is set to "Public" in your Cal.com settings.
***
## What's Next?
Now that you have basic booking set up, you can:
* **Add availability checking** so customers see open slots first
* **Use Webhook Mode** for private calendars (requires API key)
* **Create multiple booking nodes** for different appointment types
***
## Need More?
Explore advanced features like webhook mode, API configuration, and booking for Simple Agents.
After configuring the node:
1. Drag a line from another node to connect it to your booking node
2. Click on the connection line between the nodes
3. Set the **transition condition** - this tells your workflow when to move to the booking step
**Example condition:**\
"When the customer confirms they want to book an appointment"
***
### Step 7: Save Your Workflow
Click **Save** in the top right corner.
***
### Step 8: Test It!
1. Start a conversation with your workflow agent
2. When the workflow reaches the booking step, it will automatically:
* Collect customer's name and email
* Book the appointment
* Send confirmation email
**Example conversation:**
```
Customer: "I'd like to book for Tuesday at 2 PM"
AI: "Perfect! May I have your name and email?"
Customer: "John Smith, john@example.com"
AI: "Great! I've booked your appointment for Tuesday at 2:00 PM.
You'll receive a confirmation email shortly!"
```
The booking happens automatically when your workflow reaches this step!
***
## 💡 Quick Reminder
**Static mode** uses public event types. Make sure your event type is set to "Public" in your Cal.com settings.
***
## What's Next?
Now that you have basic booking set up, you can:
* **Add availability checking** so customers see open slots first
* **Use Webhook Mode** for private calendars (requires API key)
* **Create multiple booking nodes** for different appointment types
***
## Need More?
Explore advanced features like webhook mode, API configuration, and booking for Simple Agents.