> ## Documentation Index
> Fetch the complete documentation index at: https://docs.openmic.ai/llms.txt
> Use this file to discover all available pages before exploring further.
# Warm Call Transfer Tutorial
> A quick step-by-step tutorial to enable warm transfers - your AI gives context to your team before they pick up
export const ArcadeEmbed = ({url, title}) => {
return
;
};
## What is a Warm Transfer?
With a **warm transfer**, your AI agent privately tells your team member about the call before connecting them to the customer.
**Example:**
* Customer tells the AI their issue
* AI calls your team and privately says: "Customer needs help with billing. They sound frustrated."
* Team member is ready and prepared
* AI connects everyone together
* No need for the customer to repeat themselves!
***
## 🎮 Interactive Demo
Watch how to set up a warm transfer:
***
## 🛠 Step-by-Step Instructions
### Step 1: Go to Simple Agents
1. Open your OpenMic dashboard
2. Click **Simple Agents** in the sidebar
3. Select your agent
***
### Step 2: Open Custom Functions Tab
Click the **Custom Functions** tab at the top.
 ***
### Step 3: Add Transfer Call Function
1. Click **Add Function**
2. Select **Transfer Call** from the list
***
### Step 4: Configure Basic Settings
Fill in these fields:
**Function Name:** `transfer_to_human`\
(Use underscores, no spaces)
**Mode:** Select **Static**
**Transfer To:** Select **Static Number** and enter a phone number\
Format: `+1234567890` (include country code)
***
### Step 5: Choose Warm Transfer
Select **Warm Transfer** as the transfer type.
***
### Step 3: Add Transfer Call Function
1. Click **Add Function**
2. Select **Transfer Call** from the list
***
### Step 4: Configure Basic Settings
Fill in these fields:
**Function Name:** `transfer_to_human`\
(Use underscores, no spaces)
**Mode:** Select **Static**
**Transfer To:** Select **Static Number** and enter a phone number\
Format: `+1234567890` (include country code)
***
### Step 5: Choose Warm Transfer
Select **Warm Transfer** as the transfer type.
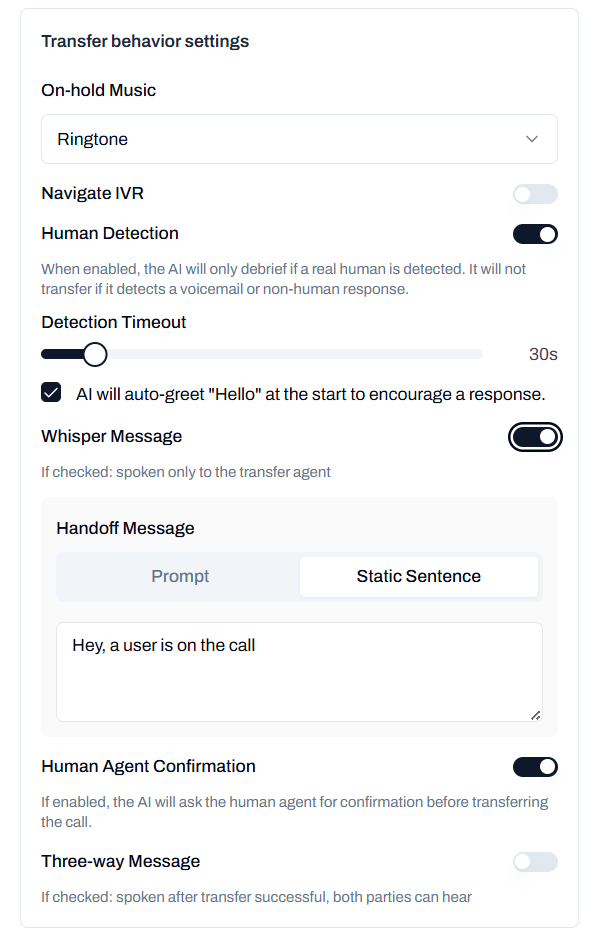 Configure these settings:
**Human Detection:** Turn ON
* Set timeout to **30 seconds**
* Keep **Auto-greet** checked
**Whisper Message:** Turn ON
* Select **Prompt**
* Enter: `Briefly explain why the customer is calling and their emotional state`
**Human Agent Confirmation:** Turn ON (optional)
* Asks your team if they're ready to take the call
**Three-way Message:** Turn ON
* Select **Static Sentence**
* Enter: `Great! You're now connected. I'll let you both take it from here!`
***
### Step 6: Save the Function
Click **Save** at the bottom.
***
### Step 7: Update Your Agent Prompt
Tell your AI when to use the transfer:
1. Go to the **Configuration** tab
2. Add this to your agent's prompt:
```
If the customer asks to speak with a human, seems frustrated,
or has a complex issue, use the transfer_to_human function.
```
***
### Step 8: Test It
1. Call your AI agent
2. Say: "I need to speak with someone"
3. Your phone will ring
4. You'll hear the whisper message privately
5. Then everyone gets connected!
Use your own phone number first to experience how the transfer works!
### Step 1: Go to Workflow Agents
1. Open your OpenMic dashboard
2. Click **Workflow Agents** in the sidebar
3. Select your workflow
***
### Step 2: Add Transfer Node
In the workflow editor, click the **Add Node** button (the "+" icon) where you want to add the transfer.
Configure these settings:
**Human Detection:** Turn ON
* Set timeout to **30 seconds**
* Keep **Auto-greet** checked
**Whisper Message:** Turn ON
* Select **Prompt**
* Enter: `Briefly explain why the customer is calling and their emotional state`
**Human Agent Confirmation:** Turn ON (optional)
* Asks your team if they're ready to take the call
**Three-way Message:** Turn ON
* Select **Static Sentence**
* Enter: `Great! You're now connected. I'll let you both take it from here!`
***
### Step 6: Save the Function
Click **Save** at the bottom.
***
### Step 7: Update Your Agent Prompt
Tell your AI when to use the transfer:
1. Go to the **Configuration** tab
2. Add this to your agent's prompt:
```
If the customer asks to speak with a human, seems frustrated,
or has a complex issue, use the transfer_to_human function.
```
***
### Step 8: Test It
1. Call your AI agent
2. Say: "I need to speak with someone"
3. Your phone will ring
4. You'll hear the whisper message privately
5. Then everyone gets connected!
Use your own phone number first to experience how the transfer works!
### Step 1: Go to Workflow Agents
1. Open your OpenMic dashboard
2. Click **Workflow Agents** in the sidebar
3. Select your workflow
***
### Step 2: Add Transfer Node
In the workflow editor, click the **Add Node** button (the "+" icon) where you want to add the transfer.
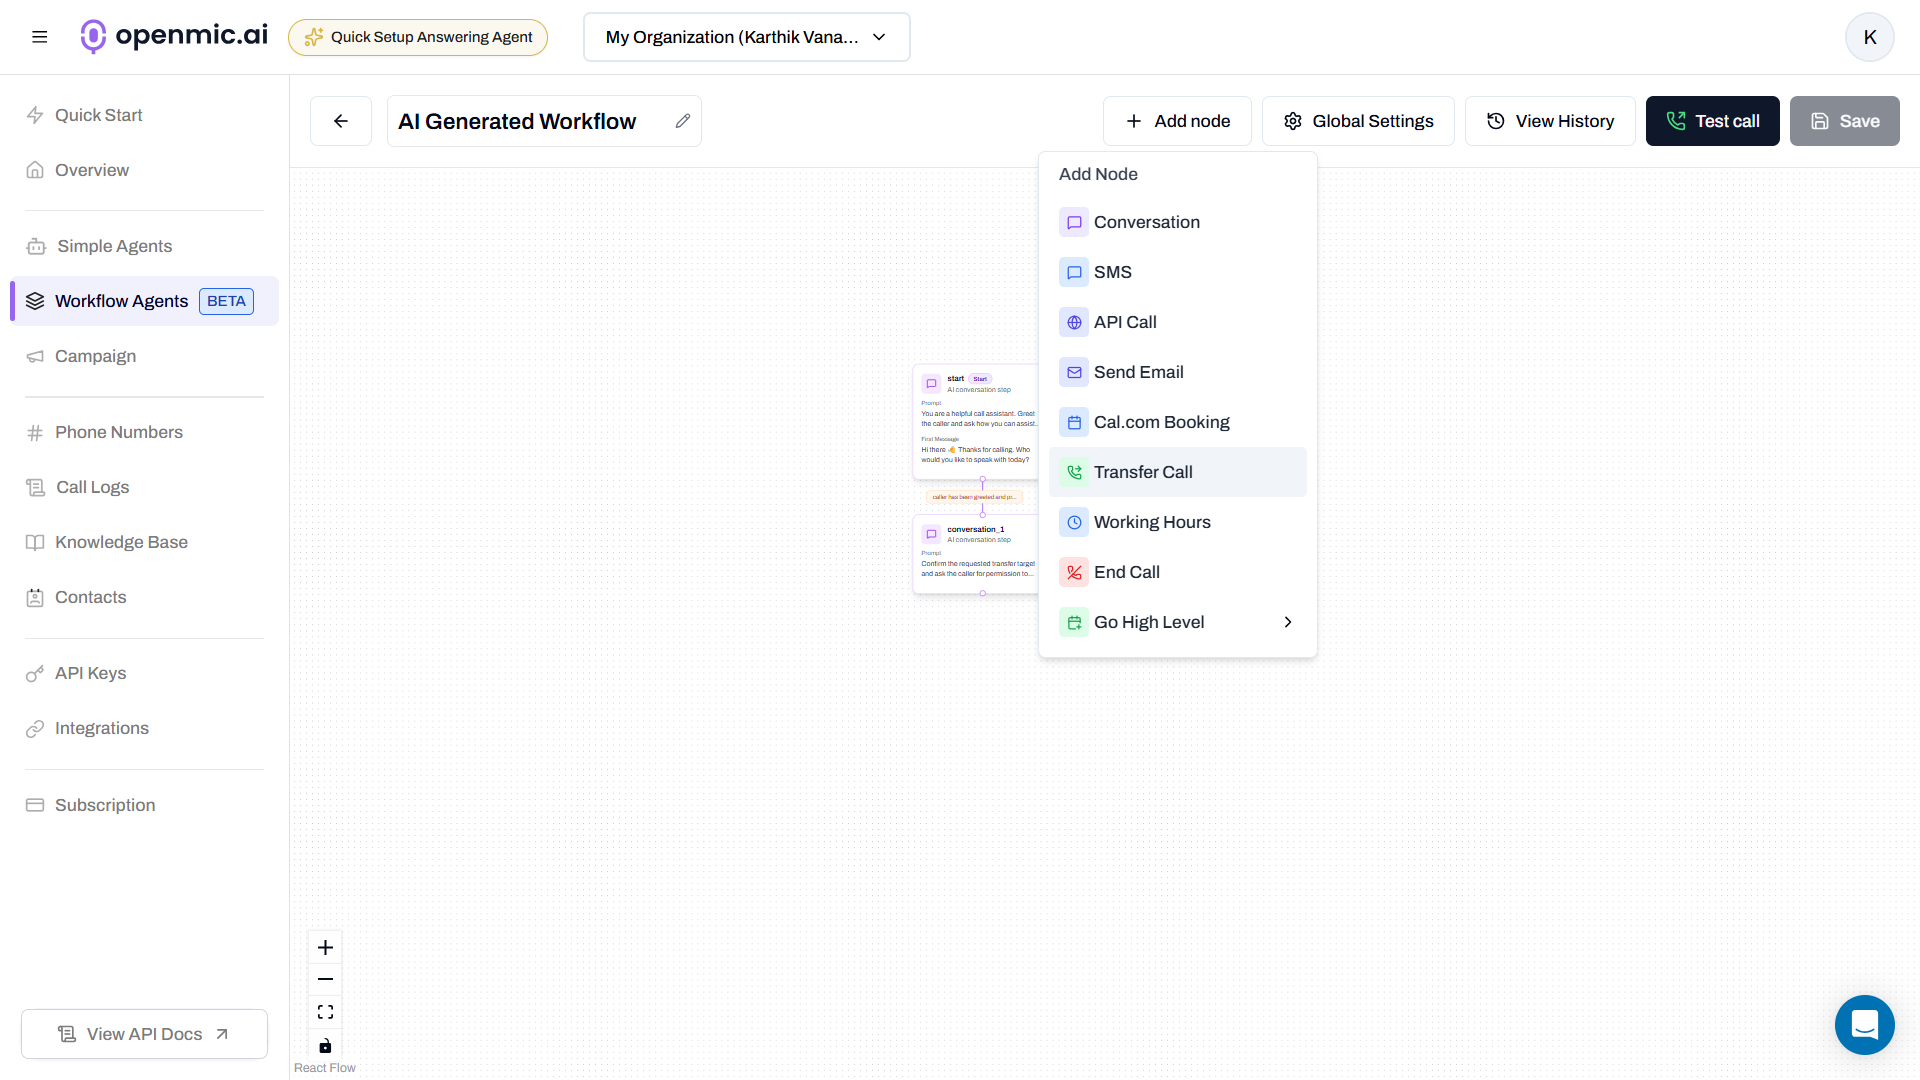 ***
### Step 3: Select Transfer Node
Click on **Transfer** from the node types.
***
### Step 4: Configure the Transfer Node
Click on the transfer node to open its settings.
***
### Step 3: Select Transfer Node
Click on **Transfer** from the node types.
***
### Step 4: Configure the Transfer Node
Click on the transfer node to open its settings.
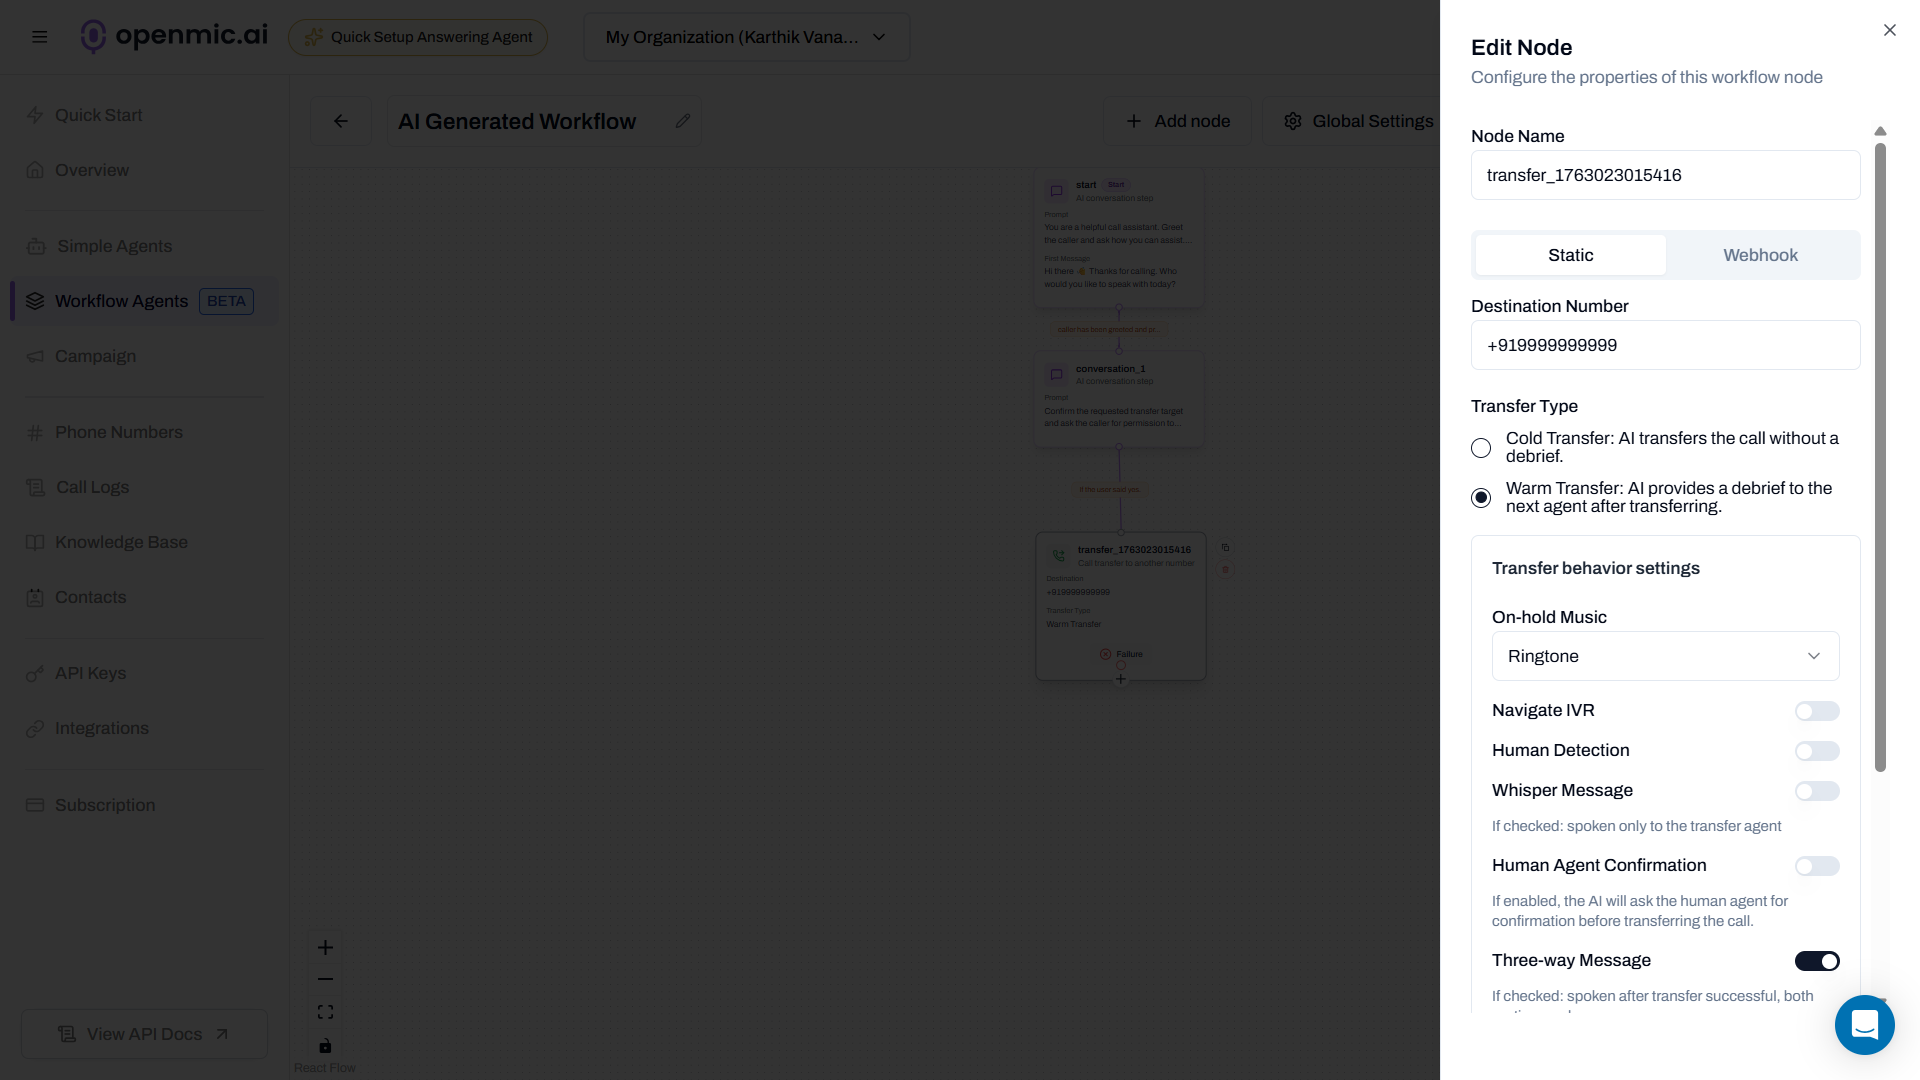 Fill in these fields:
**Function Name:** Give it a descriptive name (e.g., "Transfer to Support")
**Mode:** Select **Static**
**Destination Number:** Enter a phone number\
Format: `+1234567890` (include country code)
***
### Step 5: Choose Warm Transfer
Select **Warm Transfer** as the transfer type.
Configure the same settings as Simple Agents:
**Human Detection:** Turn ON
* Set timeout to **30 seconds**
* Keep **Auto-greet** checked
**Whisper Message:** Turn ON
* Select **Prompt**
* Enter: `Briefly explain why the customer is calling and their emotional state`
**Human Agent Confirmation:** Turn ON (optional)
**Three-way Message:** Turn ON
* Select **Static Sentence**
* Enter: `Great! You're now connected. I'll let you both take it from here!`
***
### Step 6: Save the Workflow
Click **Save** in the top right corner.
***
### Step 7: Test It
1. Call your workflow agent
2. When the workflow reaches the transfer node, it will automatically execute
3. Your phone will ring
4. You'll hear the whisper message privately
5. Then everyone gets connected!
The transfer happens automatically when your workflow reaches this step - no need to update prompts!
***
## Need More?
Explore advanced features like webhook mode, dynamic routing.
Fill in these fields:
**Function Name:** Give it a descriptive name (e.g., "Transfer to Support")
**Mode:** Select **Static**
**Destination Number:** Enter a phone number\
Format: `+1234567890` (include country code)
***
### Step 5: Choose Warm Transfer
Select **Warm Transfer** as the transfer type.
Configure the same settings as Simple Agents:
**Human Detection:** Turn ON
* Set timeout to **30 seconds**
* Keep **Auto-greet** checked
**Whisper Message:** Turn ON
* Select **Prompt**
* Enter: `Briefly explain why the customer is calling and their emotional state`
**Human Agent Confirmation:** Turn ON (optional)
**Three-way Message:** Turn ON
* Select **Static Sentence**
* Enter: `Great! You're now connected. I'll let you both take it from here!`
***
### Step 6: Save the Workflow
Click **Save** in the top right corner.
***
### Step 7: Test It
1. Call your workflow agent
2. When the workflow reaches the transfer node, it will automatically execute
3. Your phone will ring
4. You'll hear the whisper message privately
5. Then everyone gets connected!
The transfer happens automatically when your workflow reaches this step - no need to update prompts!
***
## Need More?
Explore advanced features like webhook mode, dynamic routing.