

Interactive Demo
See how to set up the Call Booking function for both simple agents and workflow agents:- Simple Agent Demo
- Workflow Agent Demo
Overview
The Call Booking function integrates your Cal.com calendars with your AI agents, enabling them to book appointments automatically during conversations. This powerful feature completes the scheduling process by not just checking availability, but actually creating confirmed bookings. Key Benefits:- Book appointments automatically during conversations
- Eliminate back-and-forth scheduling coordination
- Reduce no-shows with instant calendar confirmations
- Seamlessly integrate with your existing Cal.com setup
Setup Instructions
- Simple Agents
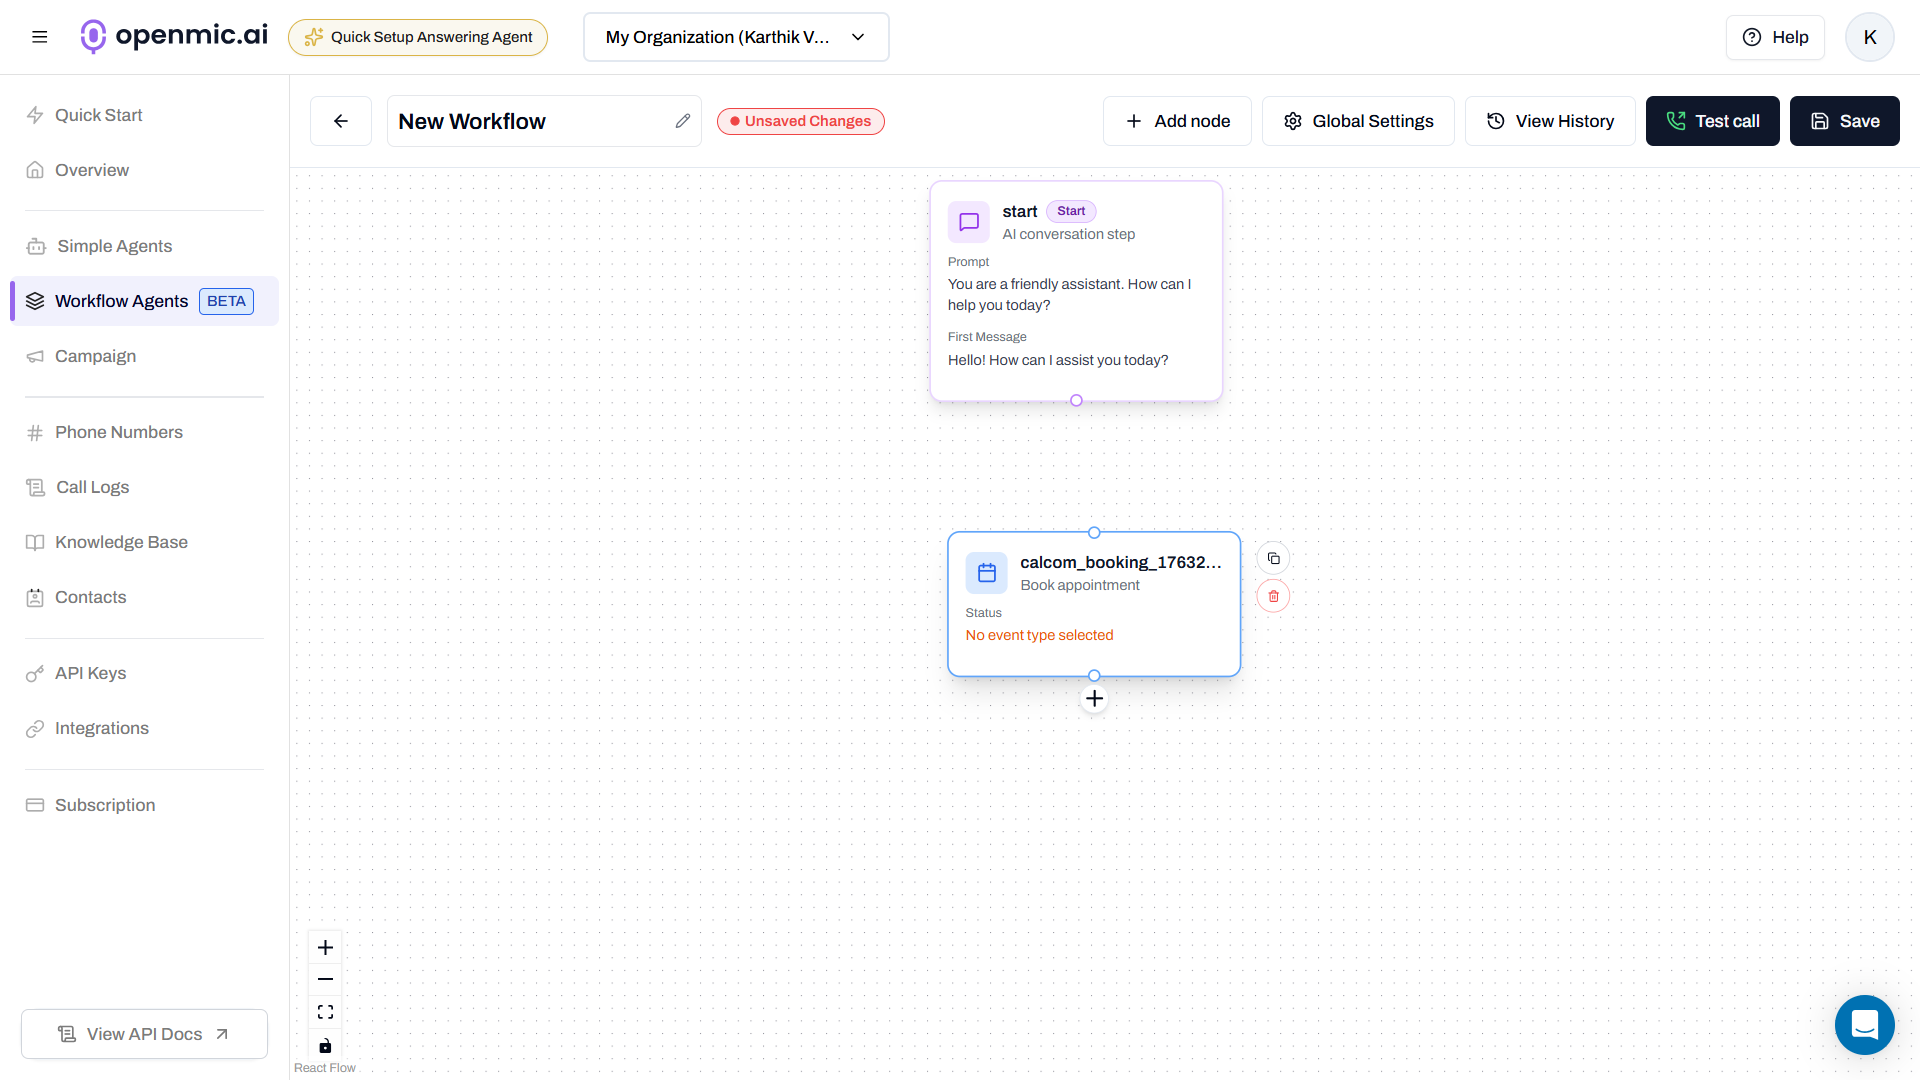
- Workflow Agents
Add Call Booking to Simple Agents
Follow these steps to add the Call Booking function to your AI voice agent:Step 1: Navigate to Simple Agents
From your dashboard sidebar, click on Simple Agents.Step 2: Select Your Agent
Click on the agent you want to configure from the list.Step 3: Open Custom Functions Tab
Click on the Custom Functions tab in the agent configuration.Step 4: Add New Function
Click the Add Function button to open the function selection menu.Step 5: Select Call Booking
Click on Call Booking from the available functions. A configuration popup will appear with two setup modes.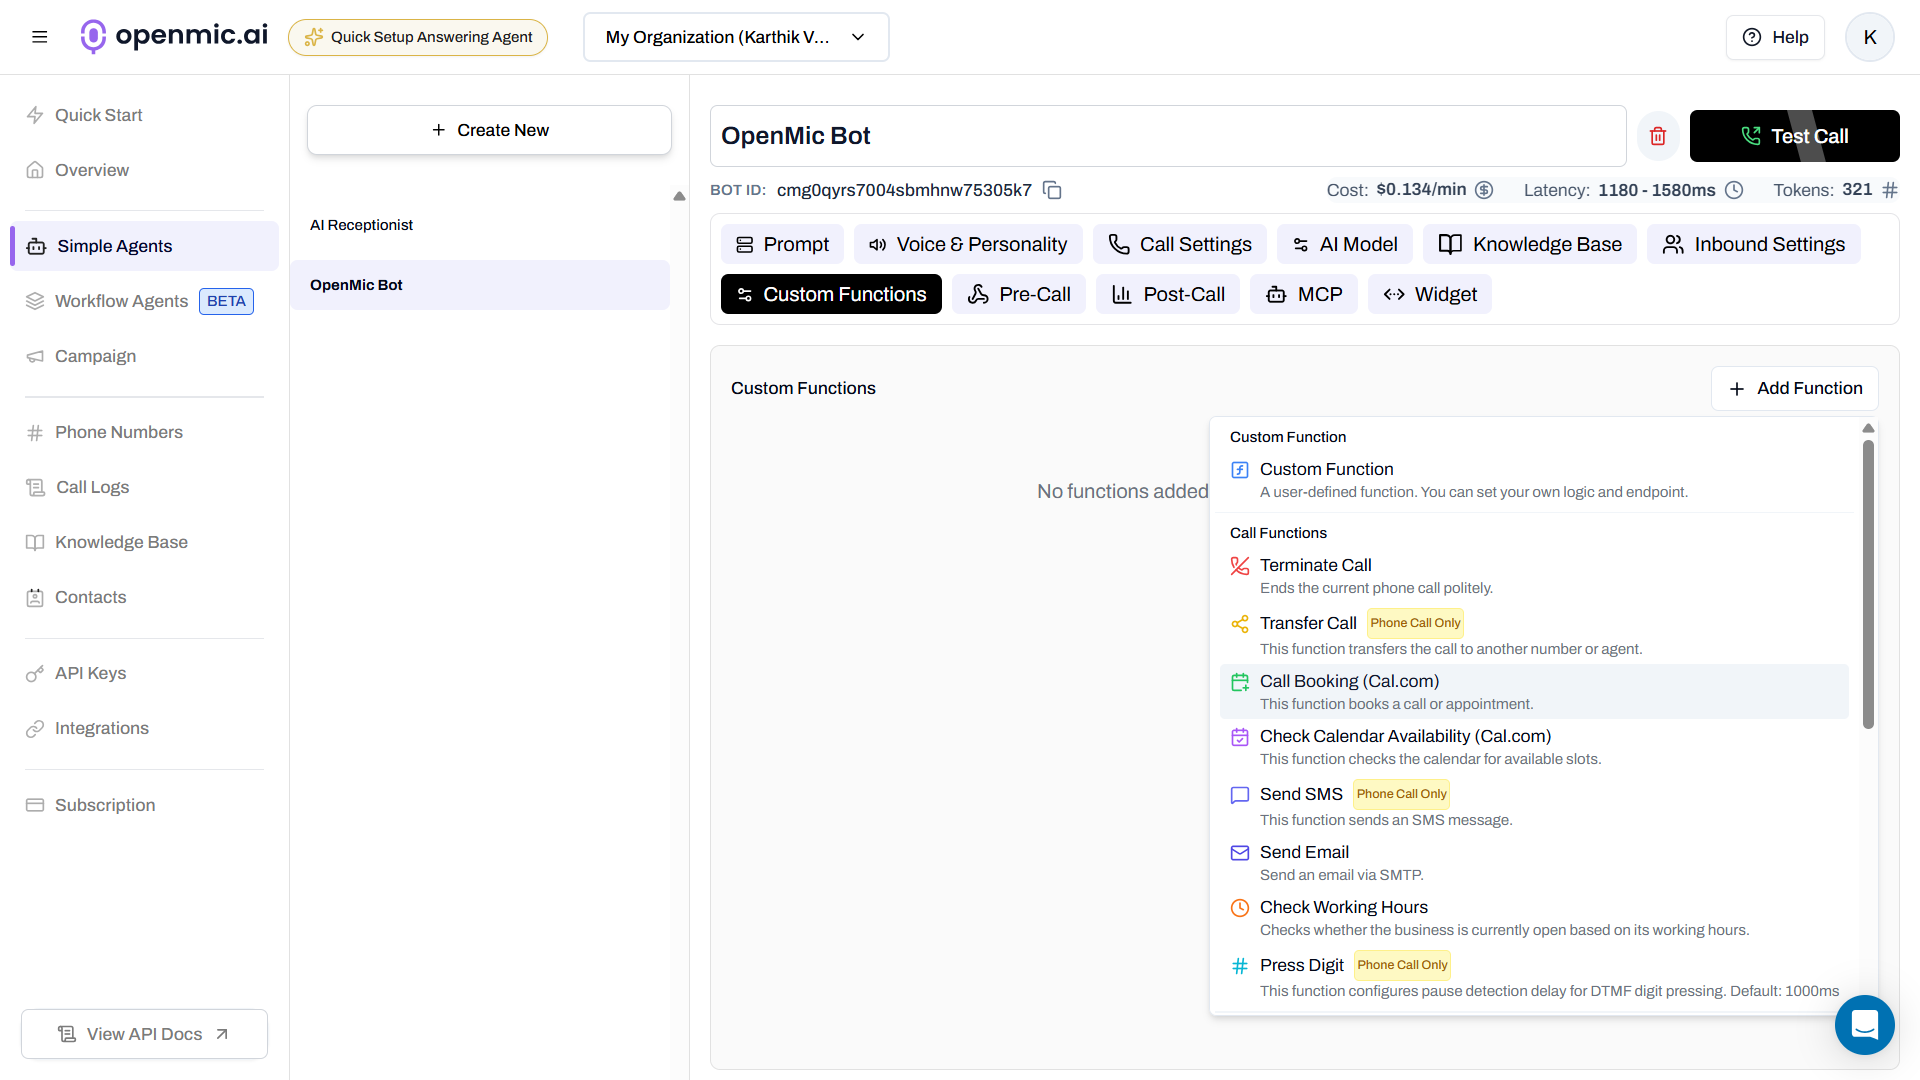
Configuration Modes for Simple Agents
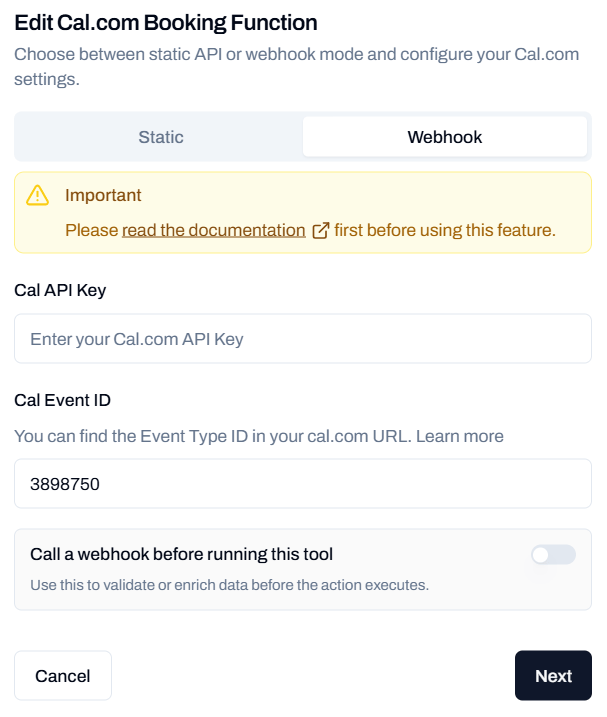
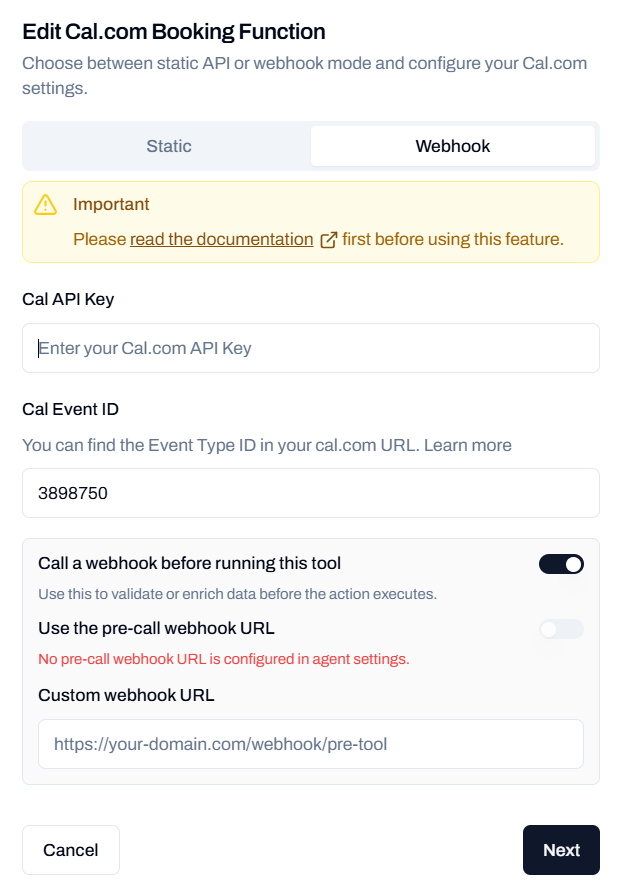
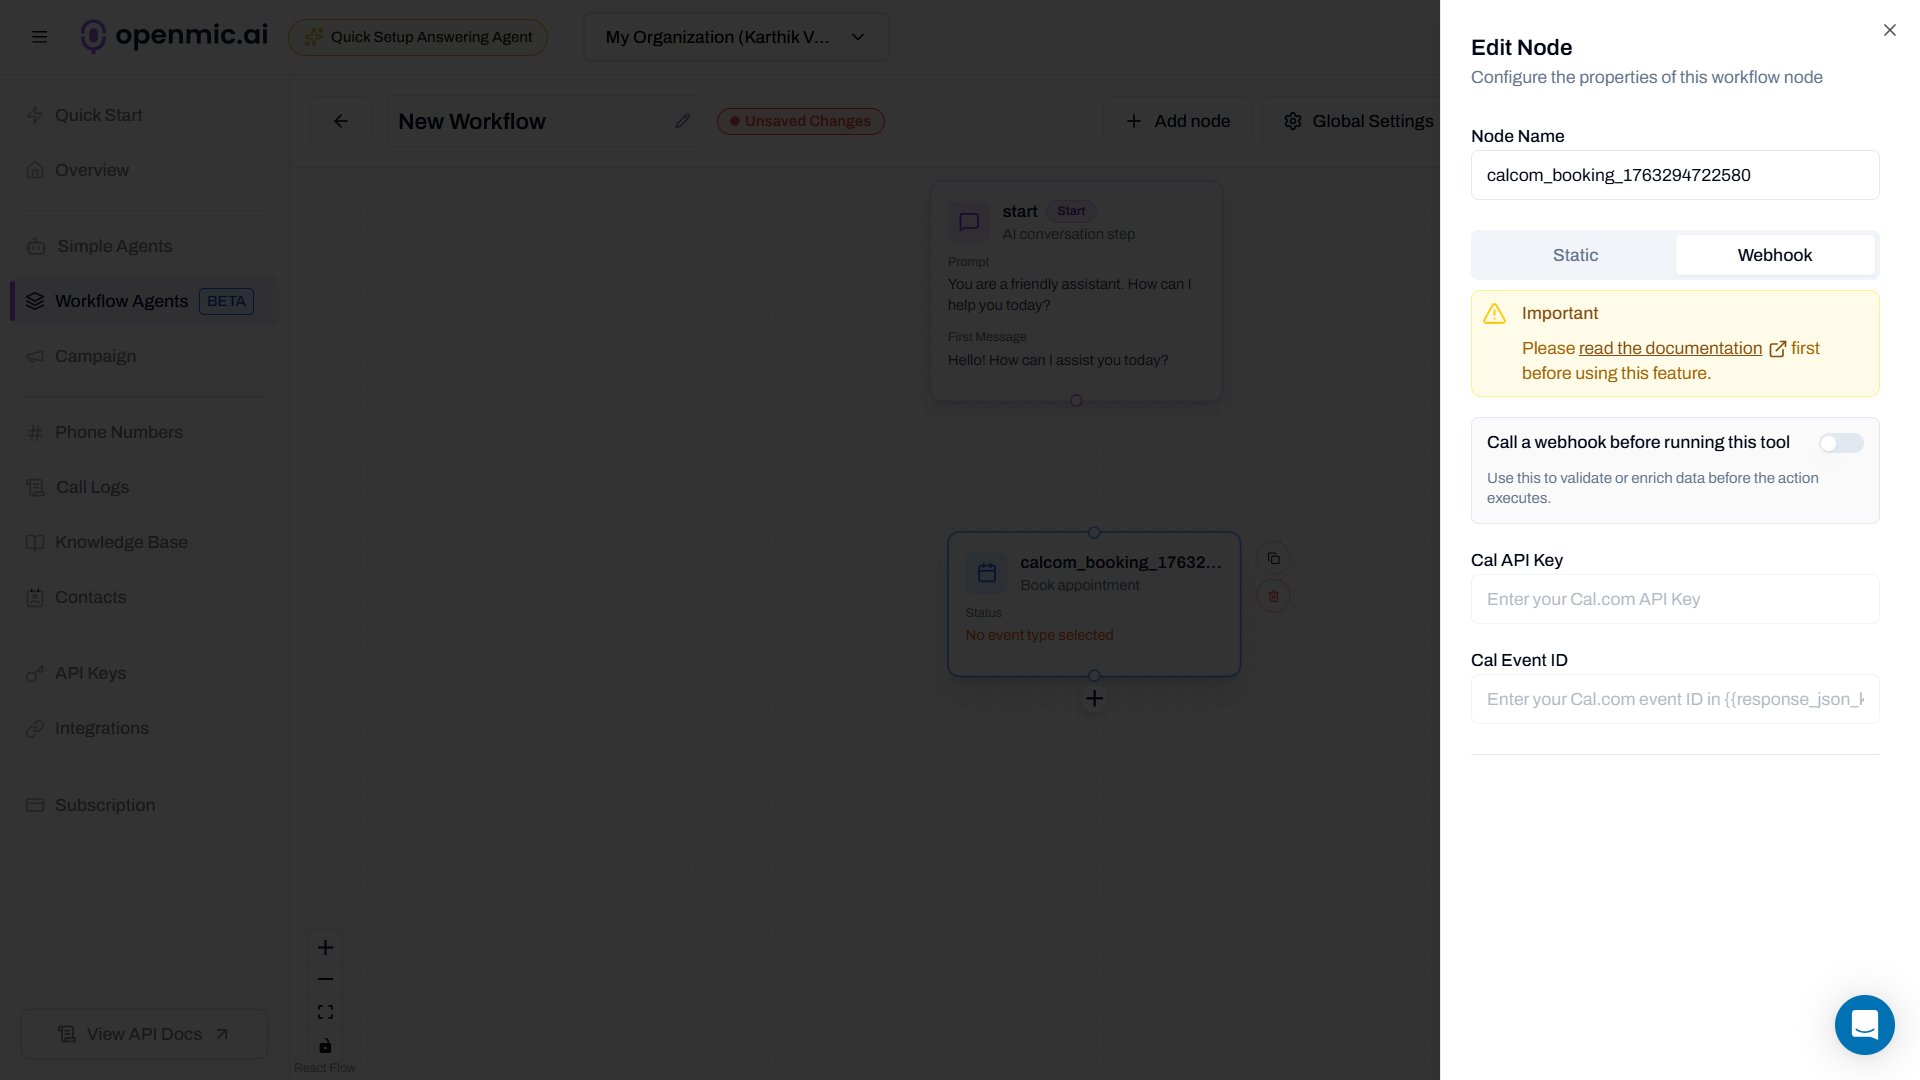
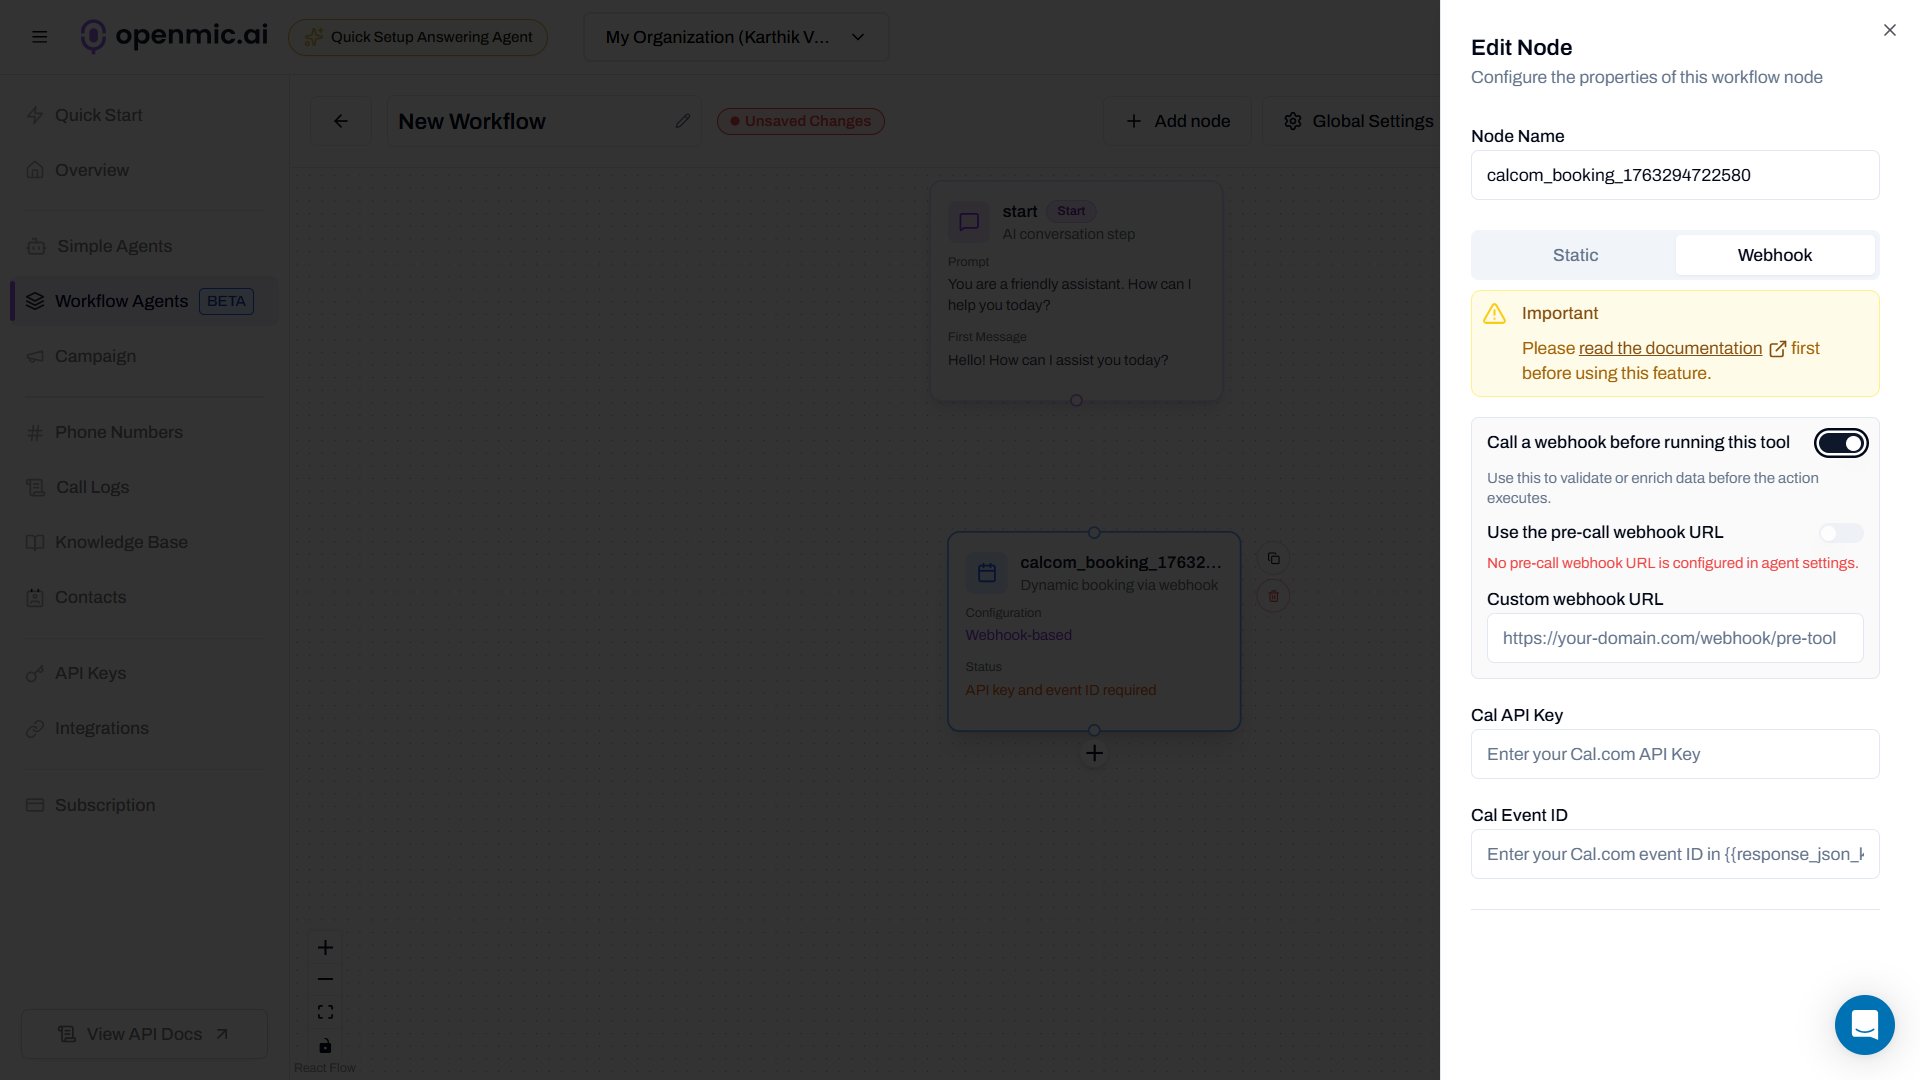
Cal.com offers two ways to connect your calendar: Static Mode (no API key required) and Webhook Mode (requires API key for more control). Choose the mode that best fits your needs.- Static Mode
- Webhook Mode
Static Mode Configuration
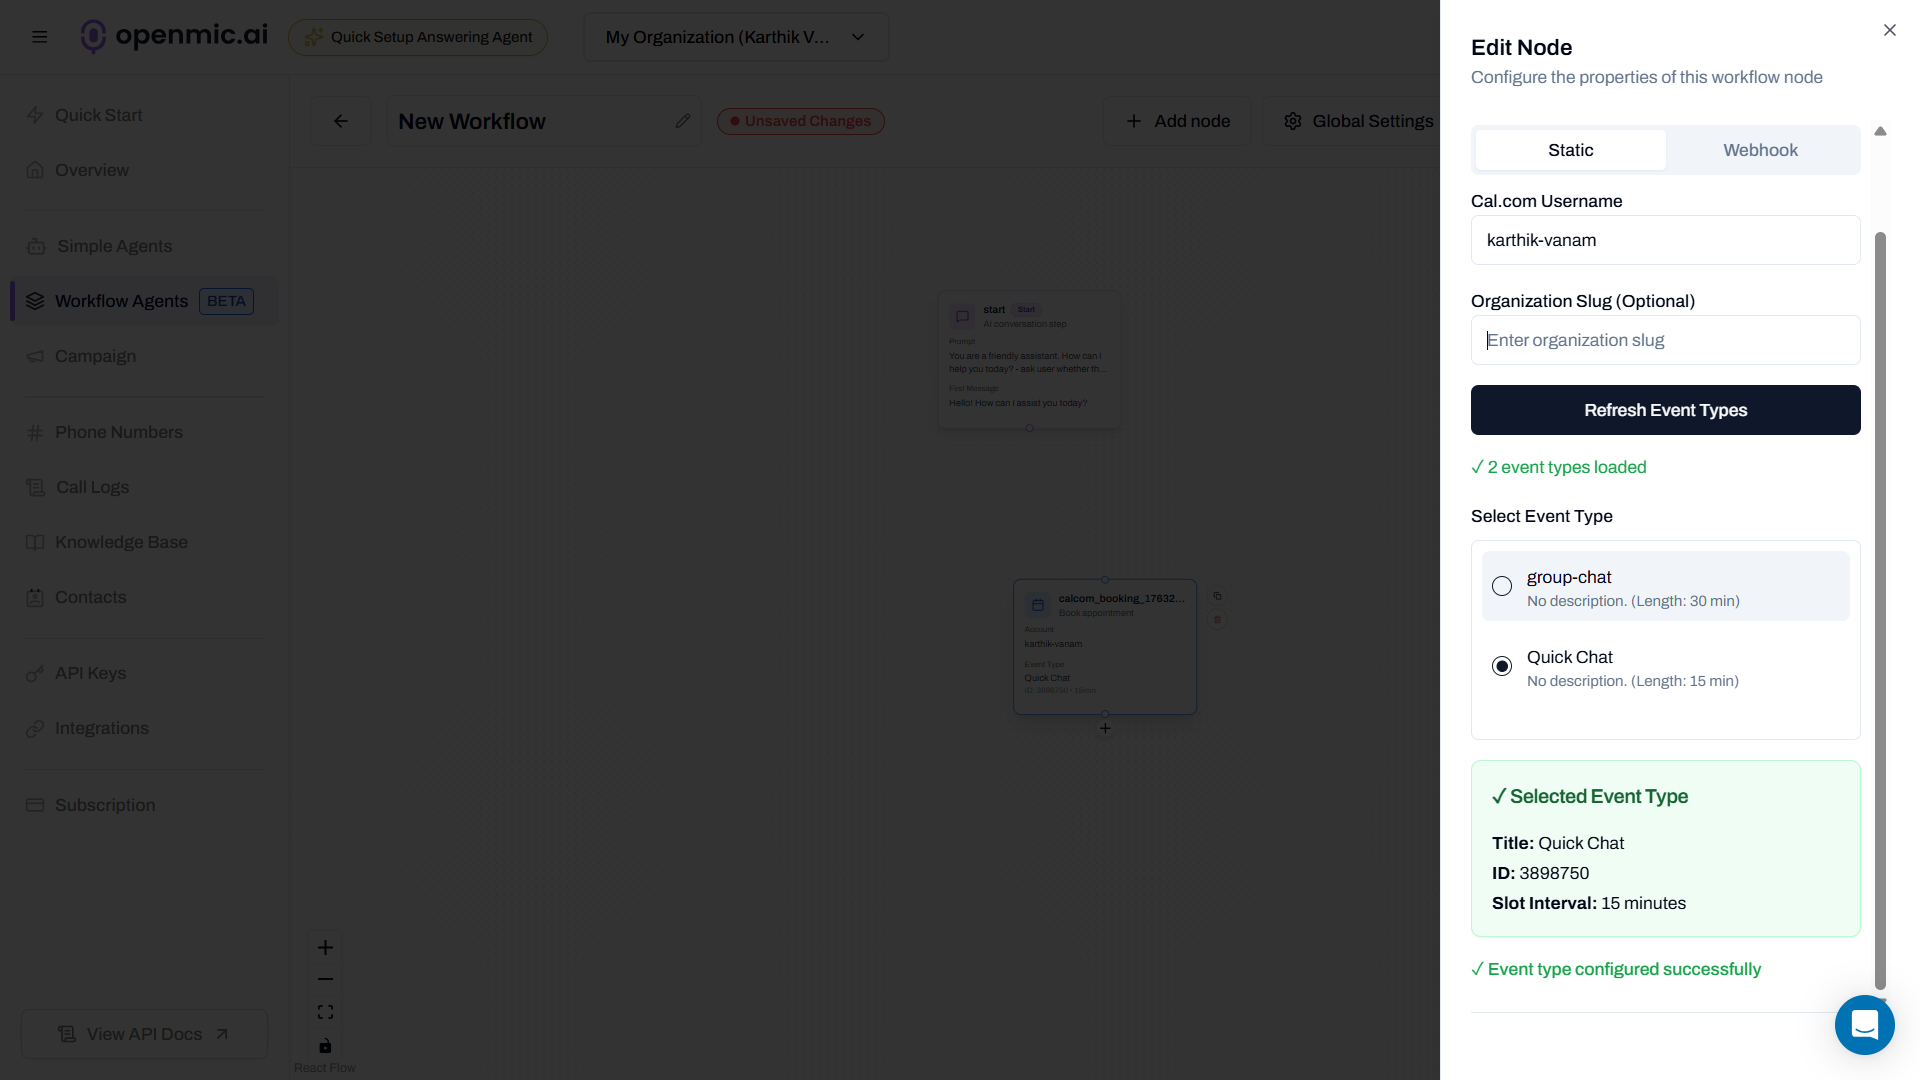
Static mode fetches publicly available event types using your Cal.com username or organization slug. This is the easiest way to get started and doesn’t require an API key.Step 1: Enter Cal.com Username or Organization Slug
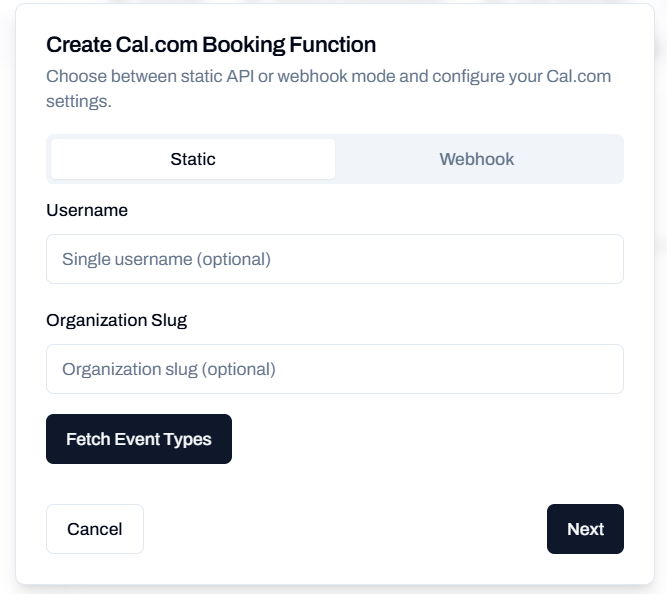
- Username: Your personal Cal.com username (e.g.,
janeif your Cal.com URL iscal.com/jane)- Find it in your Cal.com profile settings
- Organization Slug: Your organization’s Cal.com slug (e.g.,
acmeif your team URLs are likeacme.cal.com/janeorschedule.acme.com/jane)- Find it in your organization settings
Step 2: Fetch Event Types

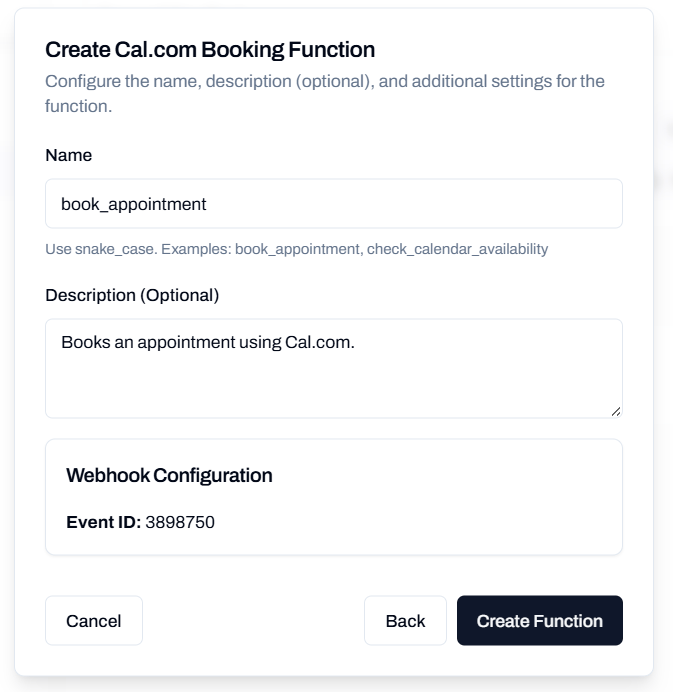
Step 3: Configure Function Options
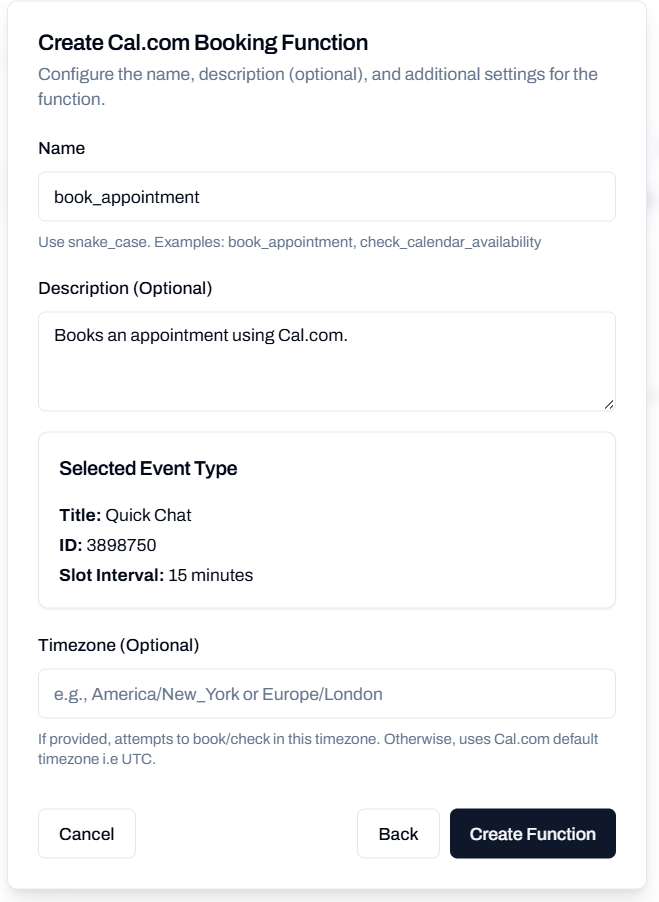
Function Name
Give your function a descriptive name in snake_case (e.g.,book_consultation, schedule_meeting, book_appointment).Description
Describe when this function should be used. This helps the AI understand when to book appointments.Examples:- “Use this when the customer wants to book a consultation appointment”
- “Book this when the customer confirms they want to schedule a meeting”
- “Use this to create an appointment booking in the calendar”
Timezone (Optional)
Specify the timezone for booking appointments (e.g.,America/New_York or Europe/London). If not provided, Cal.com will use its default timezone (UTC).Step 4: Create Function
Click Create Function to save your configuration. The function is now ready to use!Step 5: Test the Function
Test your newly created function:- Start a call or conversation with your AI agent
- Ask your agent to book an appointment, for example:
- “I’d like to book an appointment for Tuesday at 2 PM”
- “Can you schedule me for next Monday at 10 AM?”
- “Book me for the 3 PM slot on Thursday”
Agent Prompt Example
To help your AI agent use the booking function effectively, add clear instructions to your agent’s system prompt: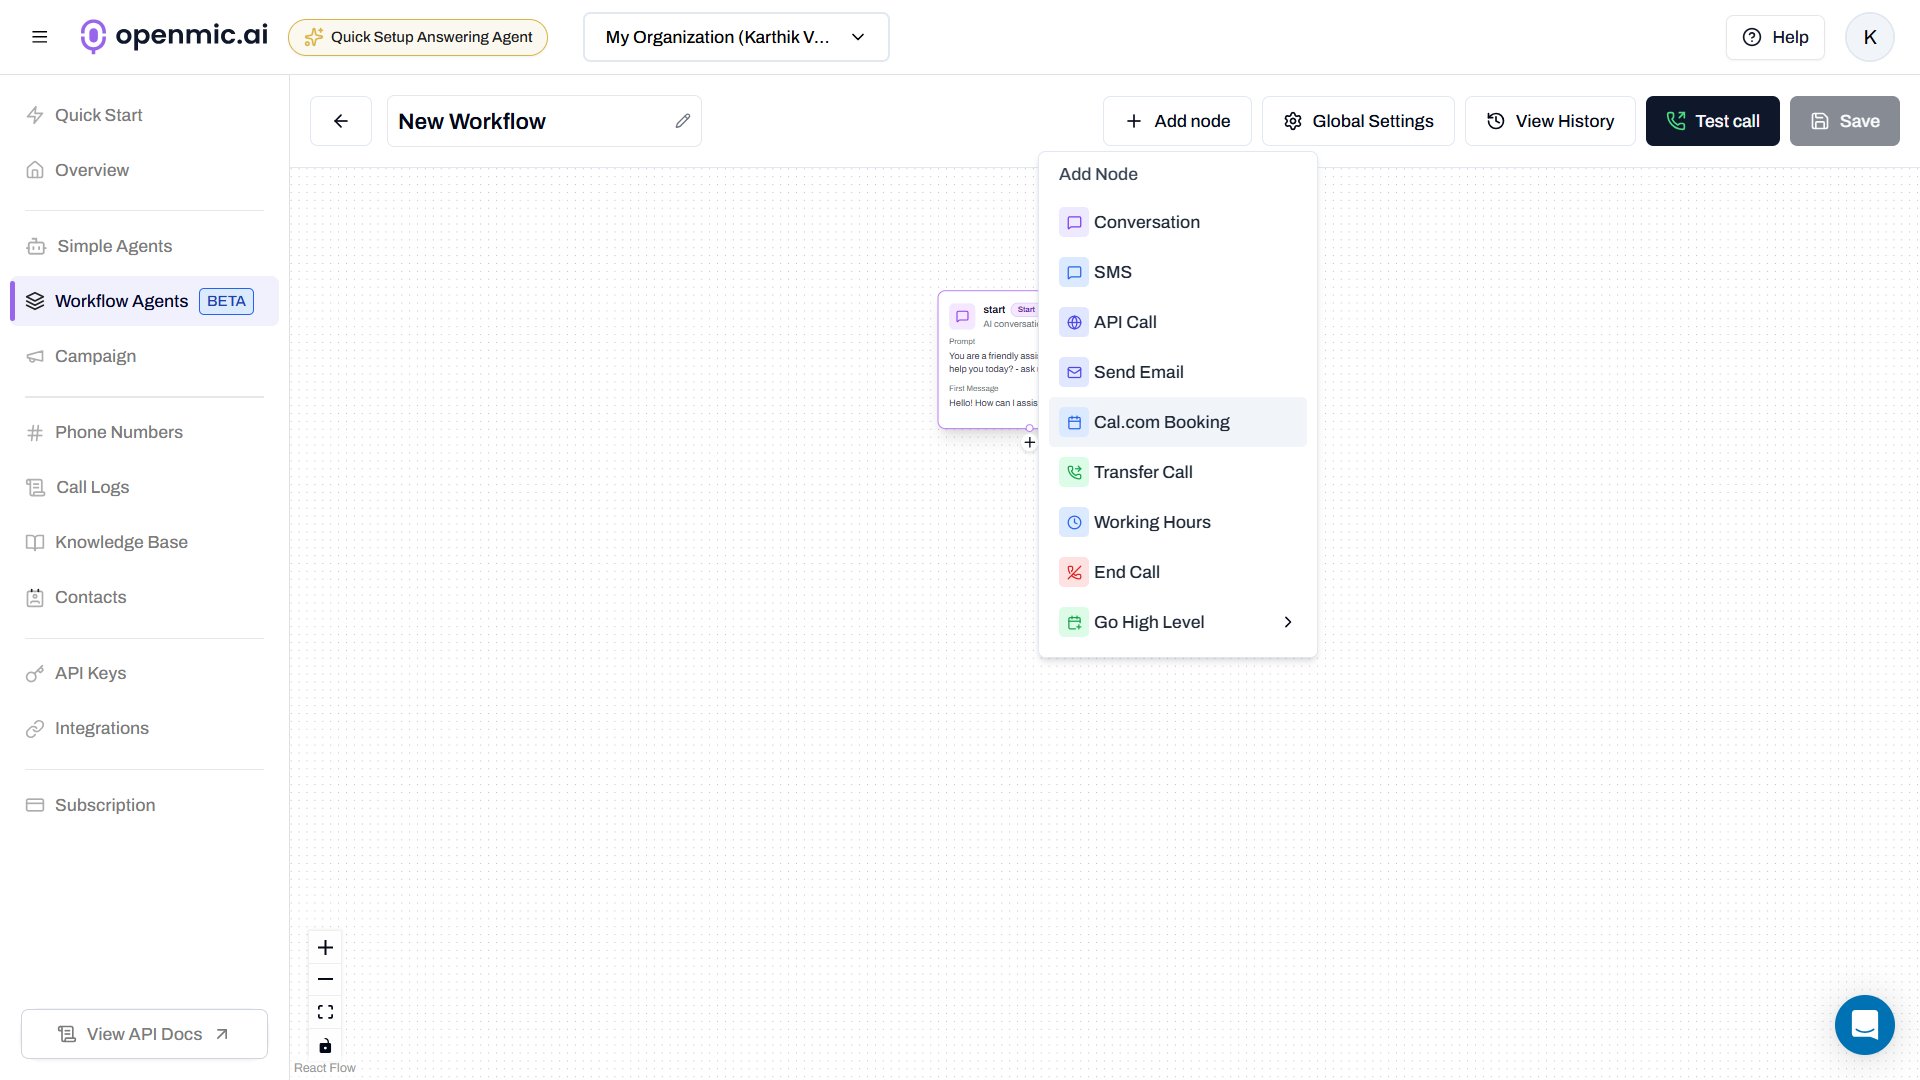
Pro Tip: Combine with Check Calendar Availability
Configuration Best Practices
Collect Required Information First
Collect Required Information First
- Ensure you have customer name and email before booking
- Confirm the exact date and time
- Verify timezone if dealing with customers in different regions
- Ask about any special requirements
Write Clear Function Descriptions
Write Clear Function Descriptions
- Be specific about when to trigger (e.g., “when customer confirms booking”)
- Mention the type of appointment or meeting
- Include any prerequisites for booking
Test Your Function Thoroughly
Test Your Function Thoroughly
- Test with your own email first
- Try booking different time slots
- Verify confirmation emails are sent
- Check that bookings appear in your Cal.com calendar
Handle Timezones Carefully
Handle Timezones Carefully
- Always specify timezone in the configuration
- Train your agent to confirm timezone with customers
- Mention timezone when confirming bookings
Error Handling
Error Handling
- Train your agent to handle booking conflicts gracefully
- Provide alternative times if preferred slot is unavailable
- Have a fallback process for failed bookings
Use Cases and Examples
Sales Consultation Booking
Sales Consultation Booking
- Mode: Static or Webhook
- Event Type: “30 Minute Sales Consultation”
- Description: “Use this when prospects confirm they want to book a consultation”
Medical Appointment Booking
Medical Appointment Booking
- Mode: Webhook (for private scheduling)
- Event Type: “Doctor Appointment”
- Description: “Use this when patients confirm they want to book an appointment”
Service Appointment Booking
Service Appointment Booking
- Mode: Static
- Event Type: “On-site Service Call”
- Description: “Use when customers confirm they want to book a service appointment”
Interview Scheduling
Interview Scheduling
- Mode: Webhook
- Event Type: “Candidate Interview - 45 min”
- Description: “Use when candidates confirm they want to schedule an interview”
Difference: Static vs Webhook Mode
Static Mode
- No API key required
- Quick and easy setup
- Perfect for public event types
- Minimal configuration needed
- Simple booking needs
- Public-facing scheduling
- Getting started quickly
- Single-user calendars
Webhook Mode
- Access to private event types
- More configuration options
- Enhanced security
- Advanced features (custom fields, webhooks)
- Private/internal scheduling
- Advanced configuration needs
- Team calendars
- Enterprise use cases
Frequently Asked Questions
Do I need a Cal.com account?
Do I need a Cal.com account?
What's the difference between Static and Webhook mode?
What's the difference between Static and Webhook mode?
How do I find my Event Type ID?
How do I find my Event Type ID?
- Go to Cal.com and open your Event Types
- Click on the event type you want to use
- Look at the URL in your browser’s address bar
- The Event Type ID is the number between the slashes (e.g.,
app.cal.com/event-types/123456)
Can I book multiple event types?
Can I book multiple event types?
What information is required to book an appointment?
What information is required to book an appointment?
- Customer name
- Customer email address
- Desired date and time
Will customers receive confirmation emails?
Will customers receive confirmation emails?
Can I cancel or reschedule bookings?
Can I cancel or reschedule bookings?
How do I handle booking conflicts?
How do I handle booking conflicts?
Can I edit the function after creating it?
Can I edit the function after creating it?
Does this work with team event types?
Does this work with team event types?
Troubleshooting
Unable to fetch event types (Static Mode)
Unable to fetch event types (Static Mode)
- Incorrect username or organization slug
- Event types are set to private in Cal.com
- Network connectivity issues
- Verify your Cal.com username/organization slug is correct
- Ensure your event types are set to “Public” in Cal.com settings
- Check your internet connection
- Try refreshing the page and fetching again
API authentication failed (Webhook Mode)
API authentication failed (Webhook Mode)
- Invalid API key
- API key was revoked or expired
- Incorrect Event Type ID
- Double-check your API key is copied correctly
- Generate a new API key in Cal.com settings
- Verify the Event Type ID is correct (check the URL in Cal.com)
- Ensure the API key has the necessary permissions
Booking fails during conversation
Booking fails during conversation
- Time slot no longer available
- Missing required information (name, email)
- Timezone mismatch
- Event type settings issue
- Check availability before booking
- Ensure all required fields are collected
- Verify timezone settings in both function and Cal.com
- Review event type configuration in Cal.com
Customer not receiving confirmation emails
Customer not receiving confirmation emails
- Email address entered incorrectly
- Cal.com email notifications disabled
- Emails going to spam folder
- Verify email address is correct
- Check Cal.com notification settings
- Ask customer to check spam/junk folder
- Add Cal.com to safe senders list
Function not triggering during conversations
Function not triggering during conversations
- Function description is unclear
- Agent prompt doesn’t instruct AI to use the function
- Missing customer confirmation
- Update the function description to be more specific
- Add clear instructions to your agent’s system prompt
- Train agent to get explicit booking confirmation from customer
- Review the function execution logs
Need Help?
If you encounter issues or have questions about the Call Booking function:- Test with your own email first to verify setup
- Review your function description and agent prompt
- Check your Cal.com event type settings and availability
- Verify API key permissions (webhook mode)
- Review function execution logs in your dashboard
- Ensure all required customer information is collected