Interactive Demo
See the Send Email feature in action:Overview
The Send Email function empowers your AI agent to send personalized emails automatically during conversations, transforming your bot into a complete communication solution. This feature enables:- Automated follow-ups: Send confirmation emails, receipts, or documentation after calls
- Team collaboration: Forward call summaries and notifications to team members
- Lead nurturing: Send personalized follow-up emails with meeting details or resources
- Real-time alerts: Notify stakeholders about important conversations or urgent matters
Configuration Steps
1. Add Send Email Function
Start by adding the Send Email function to your bot:- Navigate to your bot’s Settings → Custom Functions
- Click Add Function and select Send Email
- The function will be automatically named
send_email(this is the name you’ll use in your agent prompts)

2. Configure Basic Settings
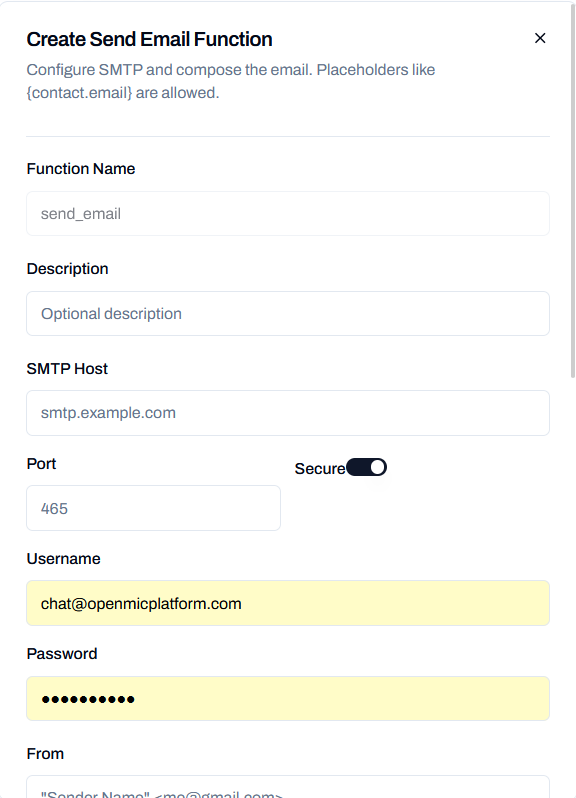
- The function name is automatically set to
send_email(snake_case) - This name will be used by the AI to trigger the email sending function
- Optional description to help identify the purpose of this email function
- Useful when you have multiple email functions configured
3. Configure SMTP Settings
Configure your SMTP server settings to connect to your email provider: SMTP Host- Enter your email provider’s SMTP server address
- Examples:
- Gmail:
smtp.gmail.com - Outlook:
smtp-mail.outlook.com - Custom:
smtp.example.com
- Gmail:
- Enter the SMTP port number
- Common ports:
- 465: SSL/TLS (secure connection)
- 587: STARTTLS (secure connection)
- 25: Unsecured (not recommended)
- Toggle this option to enable SSL/TLS encryption
- Recommended: Keep this enabled for security
- Required for ports 465 and 587 with most providers
- Enter your email account username (usually your email address)
- Example:
user@example.com
- Enter your SMTP password or app-specific password
- Some providers require app-specific passwords instead of regular passwords
- For Gmail setup instructions, see the Gmail SMTP Setup below
- This password is stored securely and encrypted
4. Quick Setup Guides
Choose your email provider below for detailed setup instructions:Gmail SMTP Setup
Follow this step-by-step guide to configure Gmail for sending emails through your OpenMic agent. Gmail offers excellent deliverability and security features, making it a popular choice for automated email sending.Prerequisites
- A Google/Gmail account
- Two-factor authentication enabled on your Gmail account (recommended for security)
- Access to your Google Account security settings
Step 1: Enable Two-Factor Authentication (2FA)
Before setting up App Passwords, you need 2FA enabled on your Gmail account:- Go to your Google Account settings
- Navigate to Security in the left sidebar
- Under “Signing in to Google”, click 2-Step Verification
- Follow the prompts to enable 2FA using your preferred method (authenticator app, SMS, etc.)
Why 2FA is required: App Passwords can only be created for accounts with
2FA enabled. This adds an extra layer of security to your email setup.
Step 2: Generate an App Password
App Passwords allow OpenMic to send emails through your Gmail account securely:- Go to your Google Account settings
- Navigate to Security in the left sidebar
- Under “Signing in to Google”, click App passwords
- You may need to sign in again and verify your identity
- Select Mail as the app type
- Select Other (custom name) as the device type
- Enter “OpenMic Bot” as the custom name
- Click Generate
Step 3: Configure SMTP Settings in OpenMic
Return to your OpenMic bot and enter these Gmail SMTP settings:- SMTP Host:
smtp.gmail.com - Port:
587(recommended for most setups) or465 - Secure: Enable this checkbox
- Username: Your complete Gmail address (e.g.,
yourname@gmail.com) - Password: Paste the 16-character App Password (not your regular Gmail password)
Step 4: Test Your Configuration
Before using in production, test your setup:- Save your SMTP configuration
- Create a test email with your own email address as the recipient
- Send a test email to verify everything works
- Check your inbox and spam folder
- Verify the email was sent from your Gmail account
Step 5: Configure Email Composition
Set up your email template: From:"Your Bot Name" <yourname@gmail.com>To: Use the Runtime Inputs to determine the recipients
Subject:
"Message from Your AI Assistant"HTML Body: Create a professional email template
Troubleshooting Gmail SMTP Issues
App Password not working
App Password not working
Solutions:
- Verify 2FA is enabled on your Google account
- Regenerate the App Password if it was compromised
- Ensure you’re using the full 16-character password (no spaces)
- Try using a different device/browser to generate the password
Authentication failed
Authentication failed
Possible causes:
- Using regular Gmail password instead of App Password
- App Password was revoked or expired
- Account has security restrictions
- Generate a new App Password
- Check if your Google account has security alerts
- Verify your account hasn’t been suspended
- Try signing out and back in to your Google account
Emails going to spam
Emails going to spam
Solutions: - Send a few test emails to warm up your account - Add your
recipients to your Gmail contacts - Avoid spam trigger words in subject
lines - Use a custom “From” name that matches your business - Consider
setting up SPF/DKIM records if using a custom domain
Daily sending limits
Daily sending limits
Gmail has sending limits to prevent abuse:
- 500 emails per day for regular accounts
- Higher limits available for Google Workspace accounts
- Monitor your sending volume
- Upgrade to Google Workspace for higher limits
- Consider using a dedicated SMTP service for high-volume sending
Best Practices for Gmail SMTP
- Security: Always use App Passwords, never your regular Gmail password
- Monitoring: Regularly check your Google Account activity for suspicious login attempts
- Backup: Have alternative email sending methods ready
- Limits: Be aware of Gmail’s daily sending limits (500 emails for personal accounts)
- Testing: Test thoroughly before deploying to production (see Testing above)
- Updates: Monitor Google’s policy changes that might affect SMTP access
5. Compose Email Message
Configure the email content that will be sent: From- Required: The sender’s email address
- Can include a display name:
"Sender Name" <me@gmail.com> - Must match the authenticated SMTP account
- Primary recipient email address(es)
- Multiple recipients:
bar@example.com, baz@example.com
- Carbon copy recipients
- Same format as “To” field
- Blind carbon copy recipients
- Recipients won’t see other Bcc addresses
- Email subject line
- Can be left empty if using runtime inputs (see Runtime Options below)
- Plain text version of the email
- Use this for simple text-only emails
- HTML formatted version of the email
- Use this for rich formatting, links, and styling
6. Configure Runtime Options
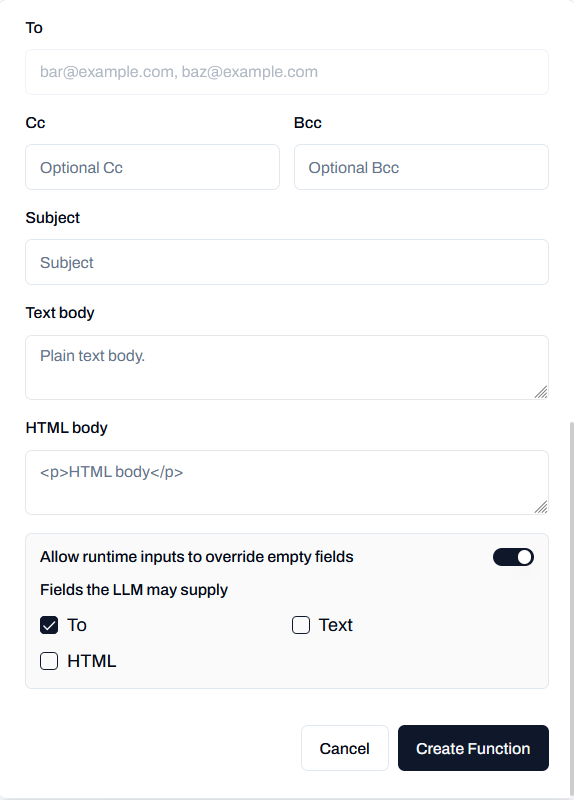
- When enabled, the AI can fill in empty email fields during the conversation
- Useful when you want the AI to determine recipients or compose content dynamically
- Fields marked as “LLM allowed” will be disabled in the form and filled by the AI
- To: Allow AI to determine recipient email address(es)
- Text: Allow AI to compose the plain text body
- HTML: Allow AI to compose the HTML body
When a field is marked as “LLM allowed”, it becomes disabled in the form.
The AI will fill this field based on the conversation context when the
function is triggered.
- You configure a base email template with some fields pre-filled (e.g., From, Subject)
- You mark certain fields as “LLM allowed” (e.g., To, Text)
- During the conversation, when the AI triggers
send_email, it will:- Use your pre-filled values for non-LLM fields
- Dynamically fill LLM-allowed fields based on the conversation context
- Send the complete email
- Pre-configure: From, Subject, HTML template
- LLM allowed: To, Text
- Result: AI sends personalized emails to different recipients with custom content
Best Practices
Update Your Agent Prompt
Train your AI agent to use email effectively by adding these instructions to your bot’s system prompt:Choose Between Text and HTML
- Text Body: Best for simple, reliable emails that display consistently across all email clients
- HTML Body: Ideal for branded emails with formatting, images, and professional styling
- Both: Provide both versions for maximum compatibility - email clients automatically choose the best format
Secure Your SMTP Credentials
- Never share your SMTP password
- Use app-specific passwords when available (Gmail, Outlook)
- Consider using environment variables or secure credential storage
- Rotate passwords regularly
Test Your Configuration
Before deploying to production:- Send a test email to yourself
- Check that emails arrive in inbox (not spam)
- Test with different email providers
- Verify HTML rendering in different email clients
Handle Multiple Recipients
When sending to multiple recipients:- Use comma-separated values:
email1@example.com, email2@example.com - Consider using Bcc for privacy when sending to multiple unrelated recipients
- Use Cc when recipients should see each other’s addresses
Use Runtime Inputs for Flexibility
Enable runtime inputs when you need:- Dynamic recipients that change based on conversation context
- AI-generated email content personalized for each user
- Flexible email composition that adapts to different scenarios
- Consistent, branded emails with fixed content
- Emails sent to the same recipients every time
- Complete control over exact wording and formatting
Advanced Configuration
Rate Limiting and Email Quotas
Be aware of email provider limitations to avoid sending failures:- Gmail: 500 emails/day for personal accounts, 5,000/day for Google Workspace
- Outlook/Hotmail: 300 emails/day
- Yahoo: 500 emails/day
- Custom SMTP: Check your provider’s limits
- Monitor your sending volume regularly
- Implement sending limits in your agent prompts
- Consider upgrading to business email plans for higher limits
- Use dedicated transactional email services (SendGrid, Mailgun) for high-volume sending
Email Deliverability Optimization
Ensure your emails reach the inbox, not spam: Authentication Setup:- Configure SPF records for your sending domain
- Add DKIM signatures for email verification
- Set up DMARC policies to prevent spoofing
- Use recognizable sender names and addresses
- Avoid spam trigger words in subjects (“free”, “urgent”, “guarantee”)
- Include clear unsubscribe links for marketing emails
- Maintain a clean sending reputation
- Warm up new email accounts gradually (start with 10-20 emails/day)
- Monitor bounce rates and unsubscribe rates
- Use consistent sending patterns
- Avoid sending to inactive or invalid addresses
Monitoring and Analytics
Track email performance to improve your setup: Key Metrics to Monitor:- Delivery Rate: Percentage of emails that reach recipients’ inboxes
- Open Rate: Percentage of delivered emails that are opened
- Bounce Rate: Percentage of emails that fail to deliver
- Spam Complaints: Recipients marking your emails as spam
- Check the function execution logs in your bot dashboard
- Monitor for SMTP connection errors
- Track successful email sends vs. failures
- Review conversation logs to see when emails are triggered
Security Considerations
Protect your email infrastructure: Credential Security:- Use app-specific passwords instead of regular passwords
- Rotate passwords regularly (every 3-6 months)
- Store credentials securely (never in code or shared documents)
- Limit access to email configuration settings
- Always enable SSL/TLS encryption (ports 465 or 587)
- Use reputable email providers with strong security
- Monitor for unusual sending patterns that might indicate compromise
- Implement rate limiting to prevent abuse
- Avoid sending sensitive information via email when possible
- Use encryption for highly sensitive content
- Comply with data protection regulations (GDPR, CCPA)
- Implement proper data retention policies
Example Use Cases
Team Notification
Team Notification
Send email notifications to your team when important calls occur.Setup:
- Configure SMTP settings
- Set From:
"OpenMic Bot" <bot@yourcompany.com> - Set To:
team@yourcompany.com - Set Subject:
"Important Call Alert - {contact.name}" - Set HTML Body with call details
- Update agent prompt: “If the caller mentions they want to speak with a manager or has an urgent issue, send an email to the team”
Appointment Confirmation
Appointment Confirmation
Send appointment confirmation emails with details extracted from the conversation.Setup:
- Configure SMTP
- Set From:
"Appointments" <appointments@yourcompany.com> - Set To:
[contact.email] - Set Subject:
"Appointment Confirmed" - Set HTML Body with appointment details
- Enable runtime inputs for To and HTML to allow dynamic content
- Update agent prompt: “After scheduling an appointment, send a confirmation email with all details”
Dynamic Lead Routing
Dynamic Lead Routing
Route lead information via email to different sales reps based on conversation context.Setup:
- Configure SMTP
- Set From:
"Lead System" <leads@yourcompany.com> - Leave To empty, enable runtime inputs for To field
- Set Subject:
"New Lead" - Set HTML Body template with lead information
- Enable runtime inputs for To and HTML
- Update agent prompt: “After qualifying a lead, send their information to the appropriate sales rep based on their location/product interest”
Follow-up Email Sequence
Follow-up Email Sequence
Send follow-up emails with resources or next steps after specific conversation topics.Setup:
- Configure SMTP
- Set From:
"Support" <support@yourcompany.com> - Set To:
[contact.email] - Set Subject:
"Resources" - Set HTML Body with links and information
- Enable runtime inputs for Subject and HTML to personalize content
- Update agent prompt: “When a caller asks about [specific topic], send them a follow-up email with relevant resources and links”
Troubleshooting
Email not sending
Email not sending
Possible causes:
- Invalid SMTP credentials (username/password)
- Incorrect SMTP host or port
- Firewall blocking SMTP port
- Email provider blocking authentication attempts
- Verify SMTP credentials are correct
- Check SMTP host and port match your email provider’s requirements
- Ensure “Secure” is enabled for ports 465/587
- Use app-specific passwords for providers that require them (see Quick Setup Guides above)
- Verify firewall rules allow outbound connections on SMTP port
Emails going to spam
Emails going to spam
Possible causes:
- Sender email not authenticated properly
- Missing or invalid SPF/DKIM records
- Suspicious email content
- Sending from a new or unverified domain
- Ensure “From” address matches the authenticated SMTP account
- Configure SPF and DKIM records for your domain
- Use a verified domain for sending emails
- Avoid spam trigger words in subject and body
- Include unsubscribe links for marketing emails
- Warm up your sending domain gradually if sending high volumes
Runtime inputs not working
Runtime inputs not working
Possible causes:
- Runtime inputs not enabled
- Field not marked as “LLM allowed”
- AI doesn’t have enough context to fill the field
- Agent prompt doesn’t instruct AI to use the function
- Enable “Allow runtime inputs to override empty fields”
- Mark the desired fields as “LLM allowed” (To, Text, or HTML)
- Update agent prompt to instruct when and how to use send_email
- Provide clear context in the conversation for the AI to extract information
- Test with explicit instructions in the agent prompt
HTML email not rendering correctly
HTML email not rendering correctly
Possible causes:
- Invalid HTML syntax
- Email client doesn’t support certain HTML features
- Missing closing tags
- Inline styles not used (some clients strip
<style>tags)
- Use inline CSS styles instead of
<style>tags - Test HTML in multiple email clients (Gmail, Outlook, Apple Mail)
- Use email-safe HTML (avoid complex CSS, JavaScript)
- Provide a Text Body fallback for clients that don’t support HTML
- Use email HTML frameworks like Foundation for Emails or MJML
- Validate HTML syntax before sending
SMTP authentication failed
SMTP authentication failed
Possible causes:
- Incorrect username or password
- Account requires two-factor authentication
- App password not used for providers that require them
- Account locked due to suspicious activity
- Double-check username and password
- For Gmail-specific issues, see the Gmail SMTP Setup troubleshooting above
- Use app-specific passwords for providers that require them (see Quick Setup Guides)
- Ensure two-factor authentication is properly configured
- Check email provider’s security settings
- Wait and retry if account is temporarily locked
- Verify account hasn’t been suspended
Multiple recipients not receiving email
Multiple recipients not receiving email
Possible causes:
- Incorrect email format (missing commas)
- Email provider limits on recipients
- Some recipients marked as invalid
- Use comma-separated format:
email1@example.com, email2@example.com - Verify all email addresses are valid
- Check email provider’s recipient limits
- Consider using Bcc for large recipient lists
- Test with a single recipient first, then add more